Before we dive in, let’s talk a little bit about Python. Imagine a programming language that is as powerful as it is easy to read, flexible, and with an ever-growing community. Yep, that’s Python for you! It was created in the late 1980s by Guido van Rossum, and it’s been skyrocketing in popularity ever since. Python’s wide-ranging applications include web development, data analysis, artificial intelligence, automation, and so much more.

Why choose Python?
Python is one of the most cherished programming languages globally! It excels in readability, making it an excellent choice for beginners. Moreover, Python’s vast array of libraries and frameworks transforms it into a versatile tool for addressing real-world challenges.
For enthusiasts, the significance of Python in the realm of Data Science cannot be overstated. It is pivotal in numerous tasks, including data manipulation, analysis, and machine learning. Indeed, Python is a powerhouse in the world of coding!
Installing Python
As I mentioned, Python is a popular open-source, high-level programming language. Just like a world traveller needs a map and gear, a programmer needs the right tools and environment. In this lesson, we’ll ensure you have everything you need to write and run Python code.
To start working with Python, the first step is installing Python. So we first need to download it and install it on our operating system.
How to install Python on Windows
There are two main ways of installing Python on Windows: installation from the official Python website or from Anaconda, a convenient distribution of Python and R programming languages. Choose the first option if you are a programmer using Python for various purposes: creating websites, network programming, and developing software applications. If, instead, your work is focused on data science and machine learning, then Anaconda is the best choice for you. Essentially, Anaconda is a powerful data science platform that provides more than 1500 built-in Python and R data science packages and the most popular Python IDEs. With Anaconda, you can choose to use the graphical user interface (GUI) instead of the command line. Also, it is adapted for processing large amounts of data, easily working with different environments and applications, and managing the package versions.
Check if Python is already installed.
Before starting the installation process, we want to check if Python is already installed on your computer (e.g., by a previous user), and if so, which version of Python. To do so, open the command line application Command Prompt (in Windows search, type cmd and press Enter) or Windows PowerShell (right-click on the Start button and select Windows PowerShell) and type there python -V. If you find that Python is already installed on your computer and want to check the path of the installation, run where.exe python in the command line application.
Install Python on Windows from the official Python website
If you see that Python isn’t installed, you can use the official Python website to install it.
Step 1. Open the Python Releases for Windows page, select the Python version, and download Python executable installer.

Here you can choose whether to download Python 2 or Python 3 (or both). Later, we will discuss in more detail the technical steps of downloading and installing both Python 2 and Python 3, but first, let’s determine which of them (or both) you really need.
Python 3 is a more recent version of Python released in 2008 and designed to fix the issues in Python 2. Compared to Python 2, Python 3 has a simpler and more intuitive syntax, offers a wide range of useful libraries (especially for data science), and a large community of Python developers maintains it. In contrast, Python 2 is no longer supported. Hence, downloading the latest Python 3 release is generally the best choice if you aren’t sure which version to use. You will most likely need only Python 3 if you’re going to work on new projects.
However, in some cases, you may also need Python 2. For example, if some of your company’s projects are written in Python 2, which is incompatible with Python 3, you might have to run older scripts. Also, sometimes, you may want to use a Python package that hasn’t been updated in Python 3. In such situations, You’ll need Python 2.
If you select the latest Python 2 release to download, choose Windows x86-64 MSI installer, which will identify your Windows version (32-bit or 64-bit) automatically:
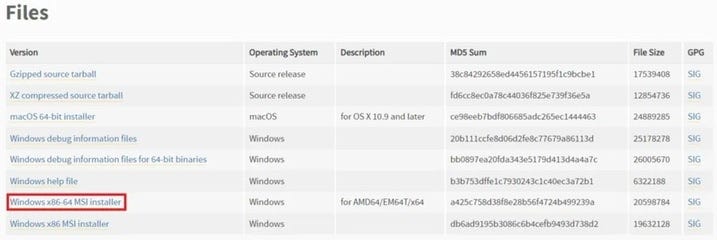
To download the latest Python 3 release, you have to choose the installer that suits your Windows version manually:

Step 2. Run the installer
Let’s follow this process step-by-step separately for Python 2 and Python 3. Remember that, depending on your needs, you can install either one of them or both of them. It will cause no issues, and you can always choose which Python version to use.
Python Version 2.x:
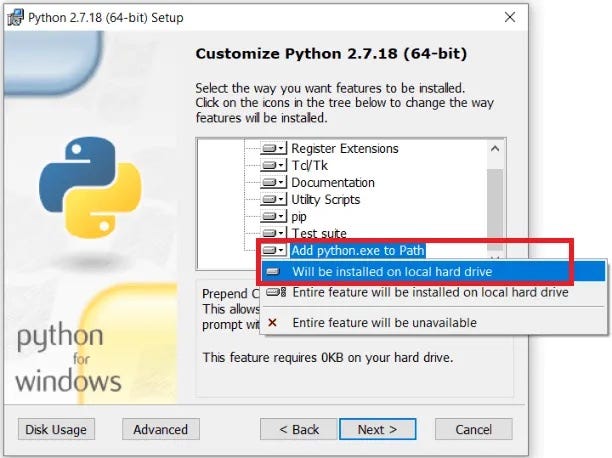
Run the downloaded executable file for Python 2 that you will find in your Downloads folder. Select at each step the following options:
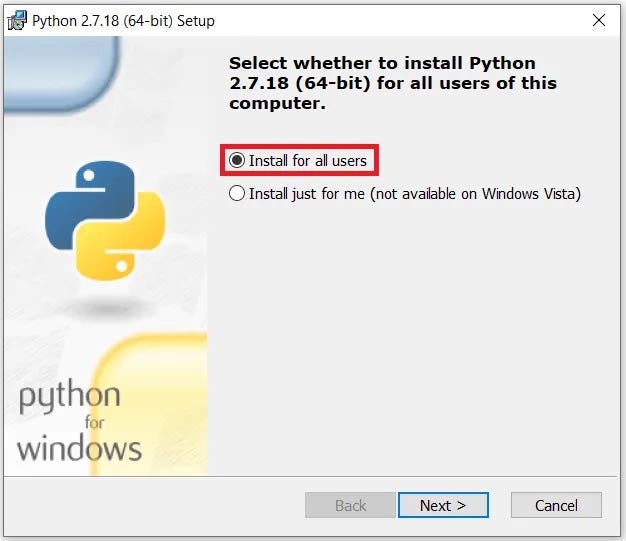
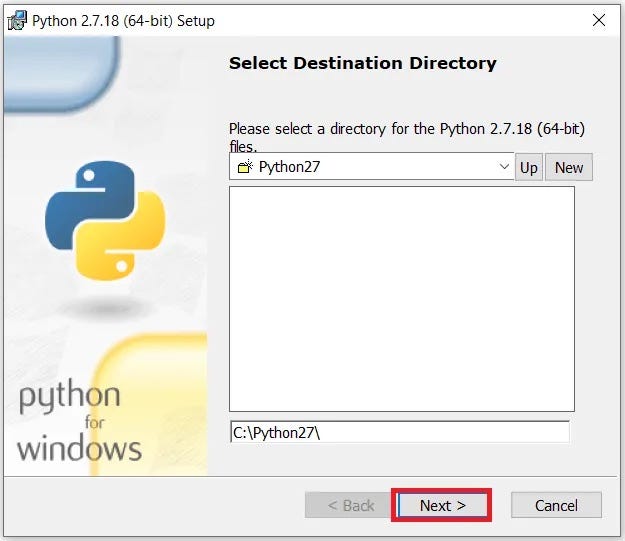
After that, confirm everything at each pop-up window to complete the installation.
Now you have the latest Python 2 release successfully installed.
Python Version 3.x.
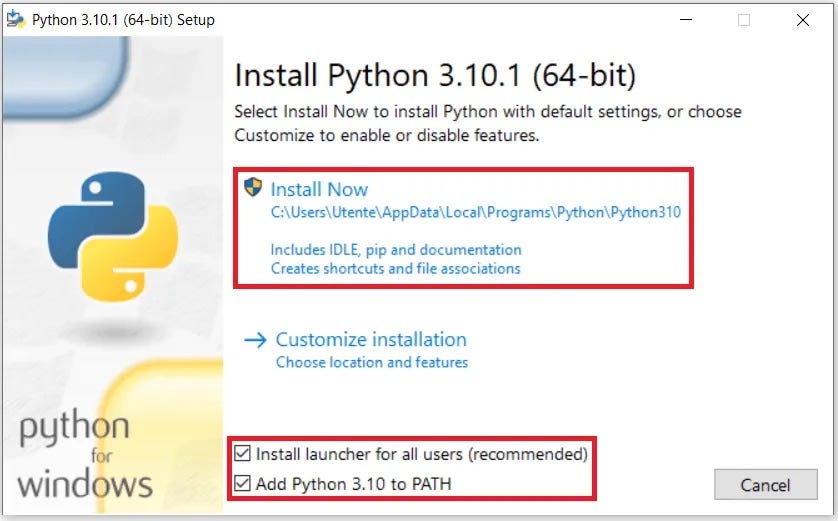
Download the installer for Python 3, and find it in your Downloads folder. On the first pop-up window, select both checkboxes at the bottom to enable adding Python to your path in Windows automatically. Then select Install Now:
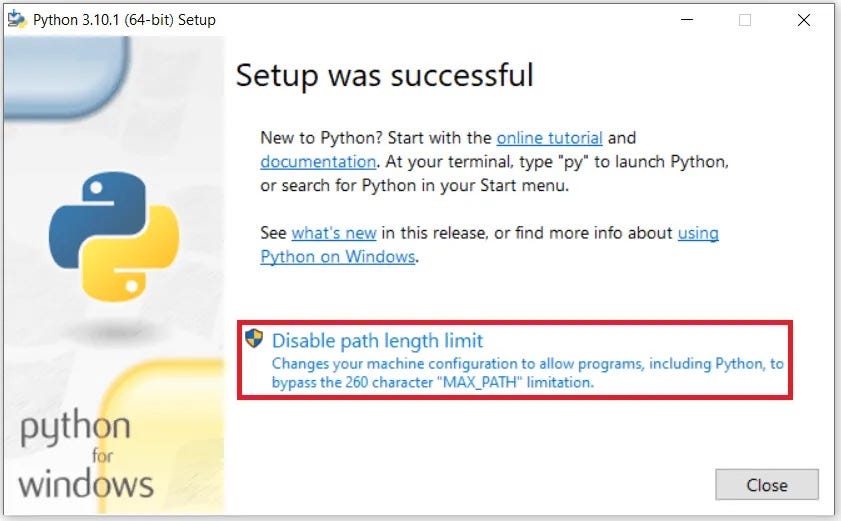
The installation process can take a few minutes. Then, in the next window, select Disable path length limit to avoid potential issues with long path names in the future:
The latest Python 3 release has been installed on your computer.
Step 3. Verify if Python was successfully installed on Windows
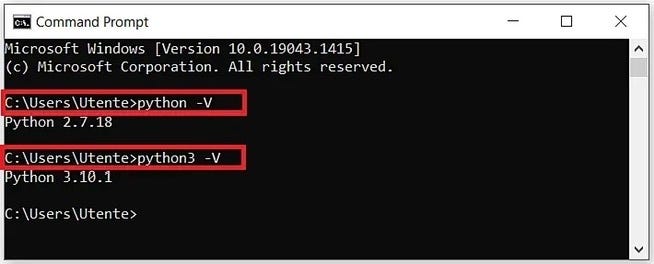
If you installed only one version of Python, open the command line and run python -V. If you installed both Python 2 and Python 3, you have to make a small adjustment that we will discuss in the following (optional) step.
Step 4 (only if you installed both Python 2 and Python 3). Reassign system variables
This step is necessary to access both Python versions from the command line easily.
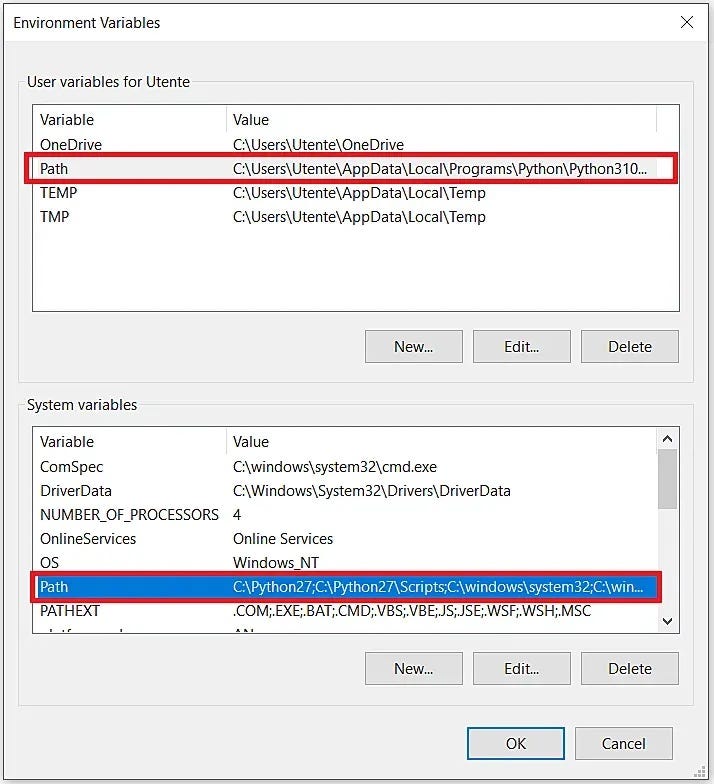
If you now run python in the command line, you will see only the version of Python 2 (in our case, Python 2.7.18). It happened because, even though you enabled the system path for both Python versions, the installers were saved as the variable sets of different levels of the path: system level (Python 2) and user level (Python 3). In such cases, priority is given to the system path, hence to Python 2. You can verify it by exploring the environment variables of Windows: in Windows, search, type, select View advanced system settings, open the Advanced tab, click the Environment Variables button. In the pop-up window, you will see that Python 3 is related to the user variables, while Python 2 is related to the system variables:
To fix this issue, you can assign different access to Python 3: python3 instead of just python:
- Open the
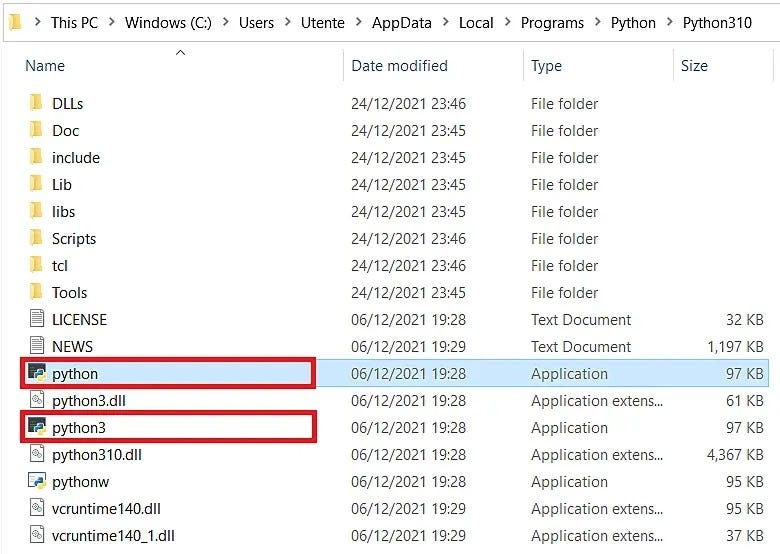
File Explorerapp in Windows search, and find the folder where you installed Python 3. By default, the path should be the following:C:\Users\username\AppData\Local\Programs\Python\Python310 - Make a copy of the
python.exefile, and rename this copy aspython3.exe:
- Re-open the command line.
- Now, you can return to Step 3 and verify the Python version for both Python 2 and Python 3:
Install Python on Windows using Anaconda
Instead of the full installer from the official Python website, you can use open-source Anaconda, a popular Python and R distribution for data science and machine learning tasks.
Step 1. Open the official Anaconda website. Step 2. Download the installer from the free Anaconda distribution.
The system will automatically suggest the most suitable package for your operating system (Windows):
Step 3. Run the installer
Find the downloaded installer for Anaconda in your Downloads folder, and run it:
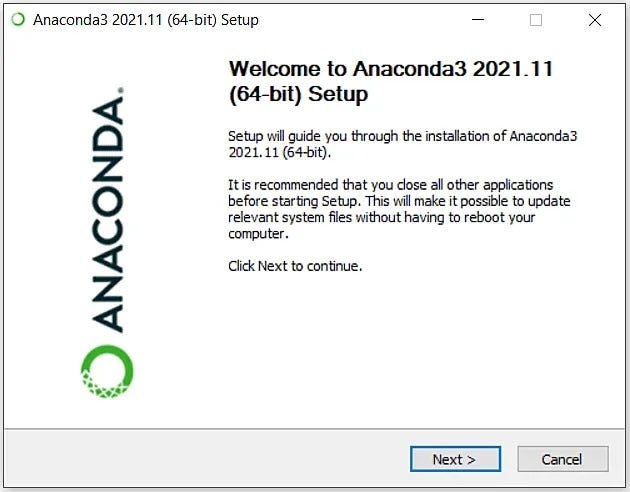
During installation, leave all the options as default on all screens. In one of the windows, though, you can decide to change the installation location, but it is generally best to leave it as it is:
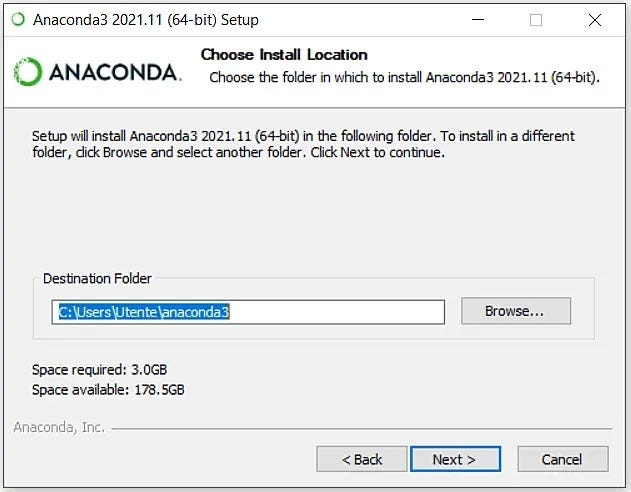
The installation process can take a few minutes.
Now Anaconda has been successfully installed on your computer.
How to run your first Python code on Windows
Now that you have installed Python, whether from the official Python website or using Anaconda Navigator, you’re ready to run your first Python code.
If you installed Python from the official Python website, type idle in Windows, search and select the necessary version of IDLE (in the case you installed different Python versions, there will be corresponding versions of IDLE):
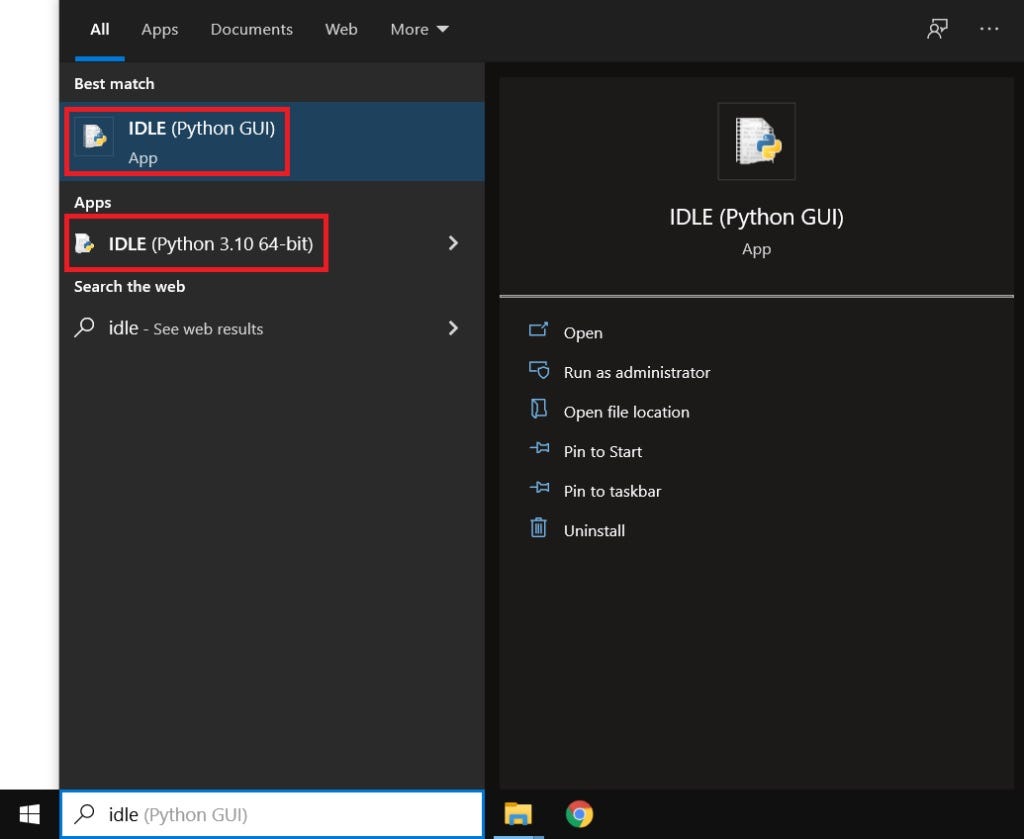
Now you can start coding, even in parallel, in different Python versions:


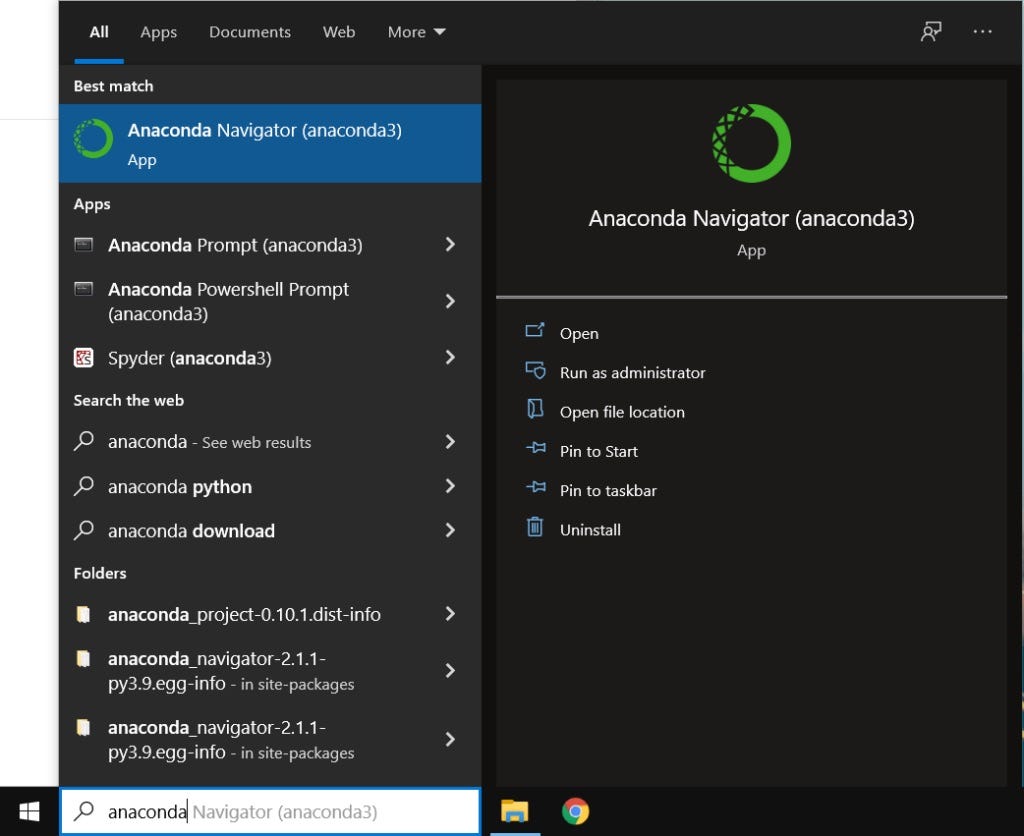
2. Choose from many applications the most suitable one for your purposes. For example, you can opt for Jupyter Notebook, a popular data science application for creating and sharing documents combining code, charts, and storytelling:
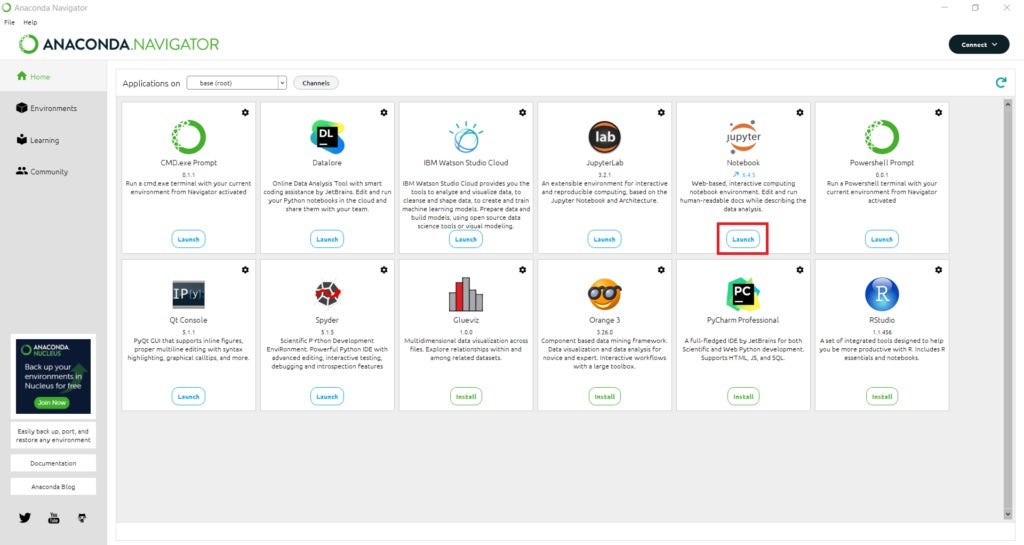
3. Navigate to the folder where you are going to save your code and create a new Python notebook:

4. Start coding:

If you installed Python from the official Python website, just as you did when initially installing Python, open the Python Releases for Windows page, select the latest Python release, and download and run the suitable installer.
If the latest release is just a new Python patch of the same major version as your current version (e.g., 3.9.8 and 3.9.9), you will see the following option in the pop-up window:
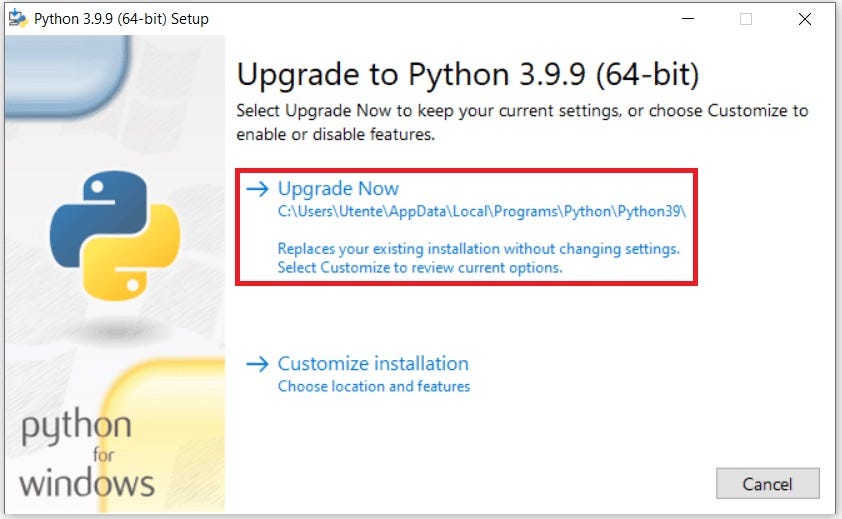
In this case, the latest Python version will be installed on your computer, and the previous version will be removed. You need to restart your machine afterward.
If the latest release is a new major version of Python with respect to your current version (e.g., 3.9 and 3.10), you will see the same option as on the initial installation:
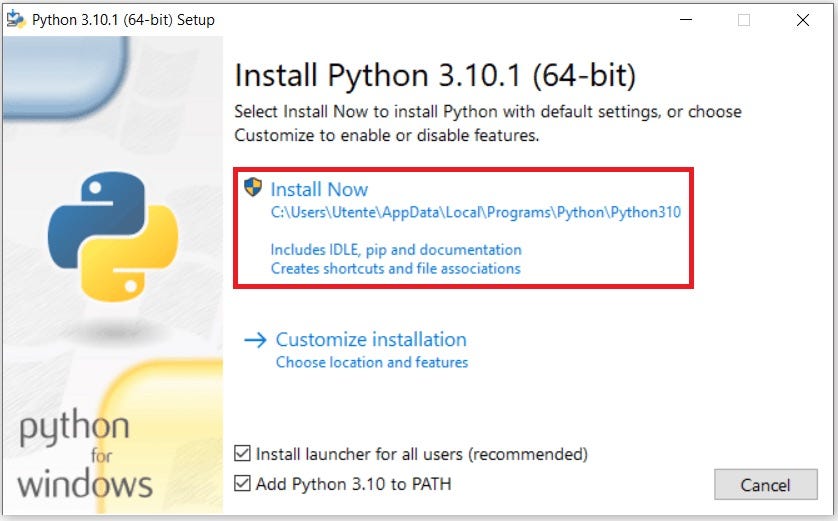
The latest Python release will be installed on your computer, and the previous version will remain. If necessary, you can uninstall it manually using the Control Panel.
If you installed Python using Anaconda, type anaconda in Windows search and open Anaconda Prompt. To update the Python version for the base (root) environment to the latest Python version available for the current Anaconda release, run conda update python.
(Side note: You may need first to update Anaconda itself to the latest version by running conda update conda.)
In the snapshot below, you can see that after updating the Python version on Anaconda to the latest version, nothing actually changed: the version remained 3.9.7, instead of being updated to the latest (currently) Python version 3.10.1:
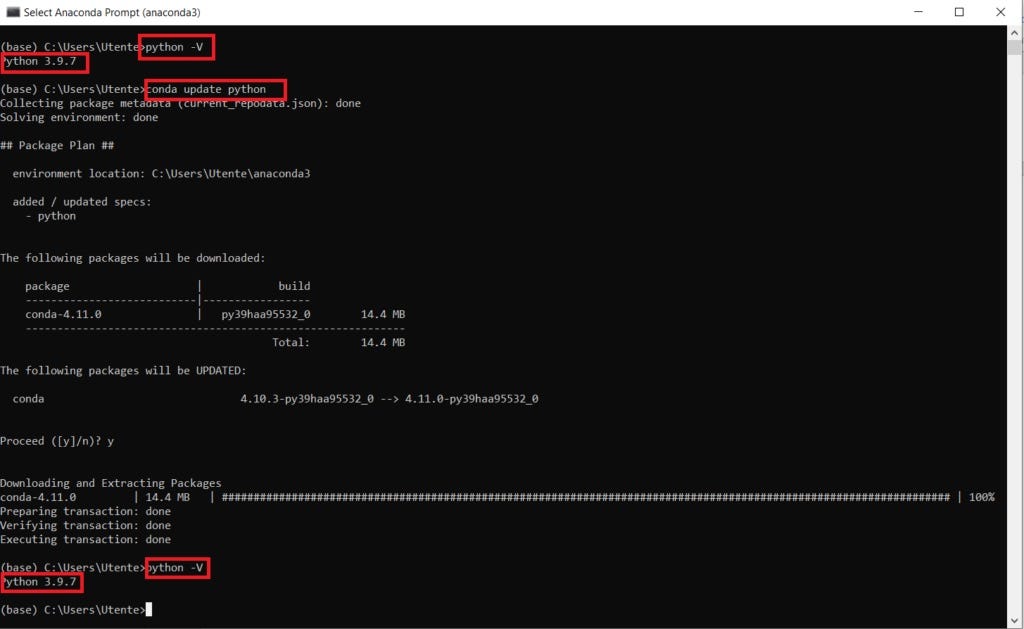
This happened because Python 3.9.7 is the latest possible Python version available for the current Anaconda release.
You can wait for the next Anaconda release or consider creating a new virtual environment on Anaconda:
conda create -n python10 python=3.10
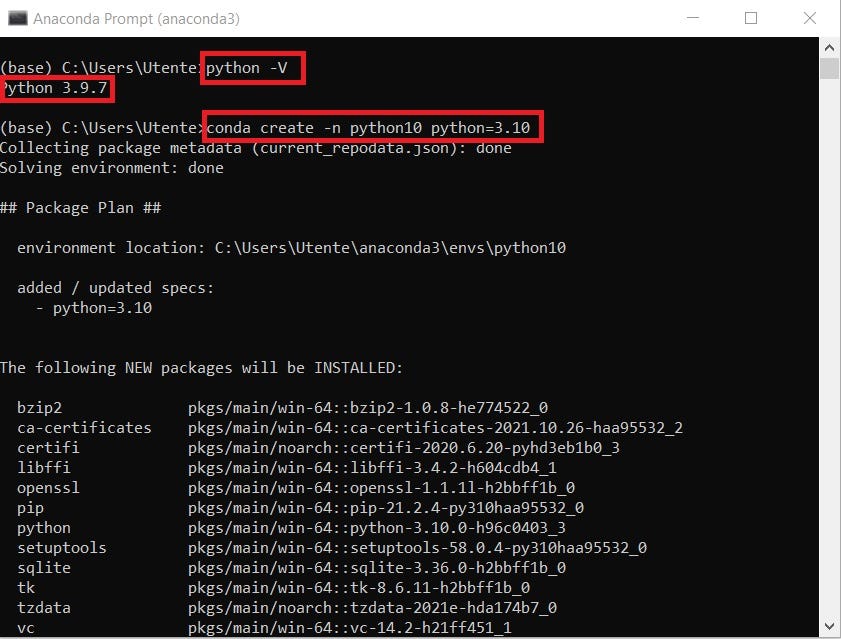
Above, you created a virtual Anaconda environment called python10 (feel free to give it any other name), with the official latest version Python 3.10.
Now, to be able to work in this environment, you have to activate it, running conda activate python10:
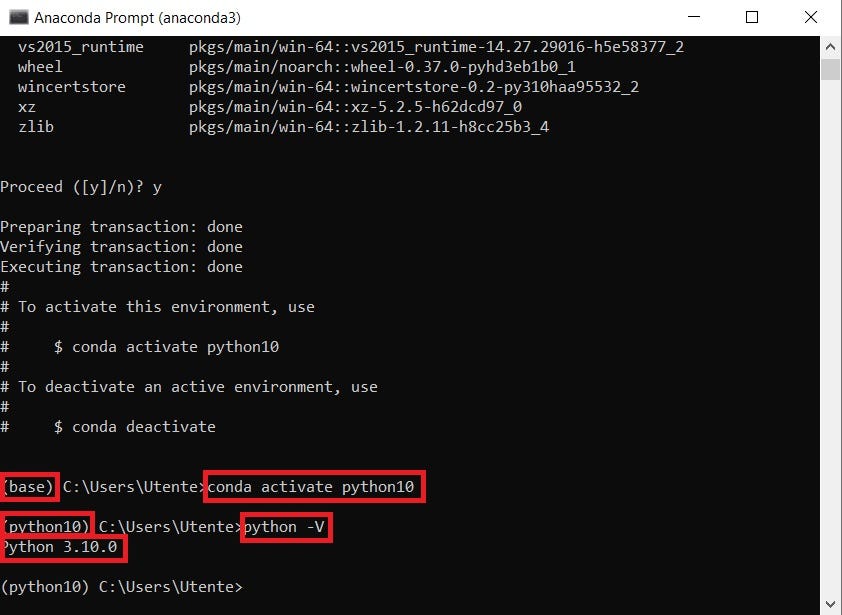
Notice how the name of the active environment changed from base to python10. Also, notice that if you check the Python version, you will see that it has been updated to Python 3.10.0.
Unfortunately, it isn’t possible to specify the exact patch of the latest version when creating a new virtual environment (meaning that you can only write python=3.10 and not python=3.10.1).
You can continue coding in Python 3.10.0 in the created virtual environment from the command line. Alternatively, since Anaconda is, first of all, a convenient GUI Interface, you can go again to Anaconda Navigator, select the new environment, install any applications you need (if they are available for that environment), and start working there.

You can also easily create a new virtual environment with a necessary Python version directly from Anaconda Navigator:
- Open the
Environmentstab of Anaconda Navigator. - Press the
Createbutton at the bottom of the screen. - Give a name to the new environment, and select the version of Python.
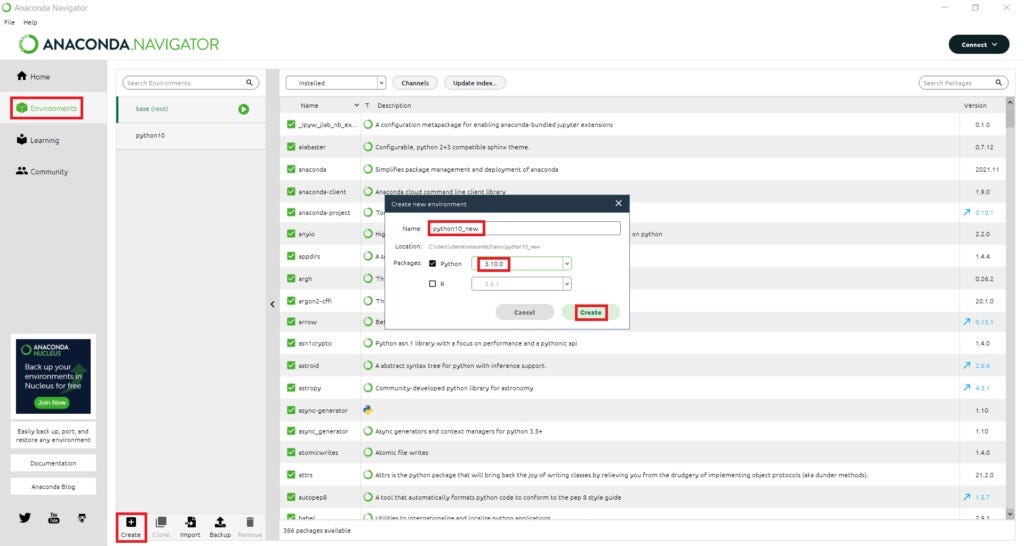
A new environment called python10_new has been created:
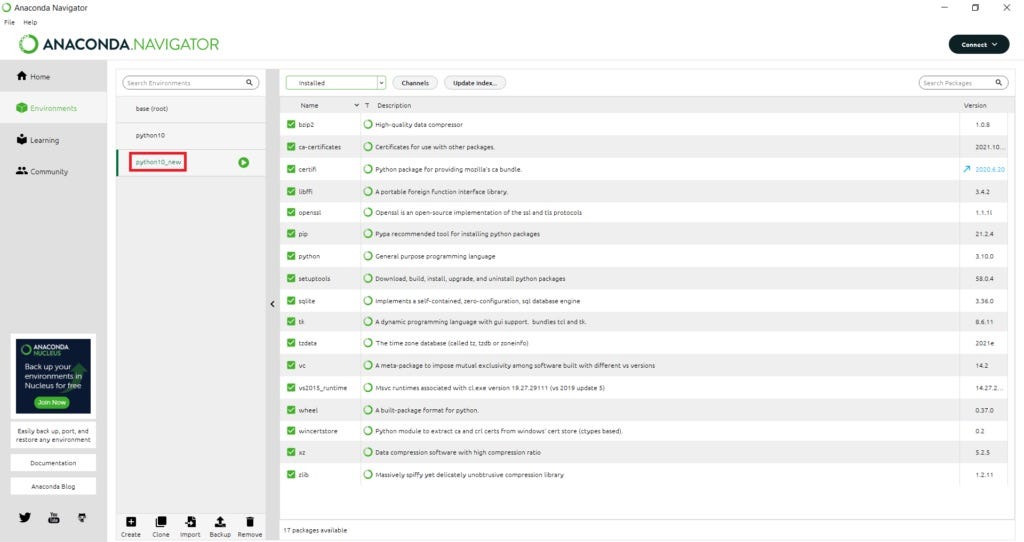
- Go to the Home tab, where the new environment will automatically be selected.
- Install any available applications you need and start coding.
Installing Python on Mac
As a novice programmer, you may wonder how to install or update Python on your Mac properly. Here, we will walk through the different ways of installing and updating Python on macOS.
Then, we will learn how to install and configure Visual Studio Code on Mac to write and run our Python code in an integrated development environment (IDE). There are different methods for installing and updating Python on Mac, but let’s stick to the third principle of the Zen of Python: “ Simple is better than complex. “ Accordingly, we will try simple methods rather than complex ones.
Installing and Updating Python on Mac
I have two pieces of news for you; one is good, the other bad. The good news is that for the sake of compatibility with legacy systems, Python 2.7 is pre-installed on your Mac, but the bad news is that Python 2.7 has been retired. Therefore, it isn’t recommended for new developments. So, if you want to take advantage of the new Python version with its many features and improvements, you need to install the latest Python alongside the pre-installed version on macOS. Before we start installing the latest version of Python, let’s see why there are different versions of the same programming language. All programming languages evolve by adding new features over time. The programming language developers announce these changes and improvements by increasing the version number.
Install Python 3 as a part of the Command Line Developer Tools
To check the current version of Python that is already installed, open the Terminal application by typing command + space and then spelling out terminal and hitting return. Now, type the following command, and then hit return to see that you have Python 2.7 pre-installed on your Mac:
Now, try the following command to check whether or not Python 3 is installed on your Mac:
~ % python3 --version
The following message will probably appear on the Terminal window,
xcode-select: note: no developer tools were found at '/Applications/Xcode.app', requesting install. Choose an option in the dialog to download the command line developer tools.
And alongside the Terminal window, a dialog box will automatically appear that says this command requires the command line developer tools. First, let’s identify the command-line developer tools. To put it briefly, the command line developer tools package is a set of tools mostly used in the development process. They help run specific commands, such as make, git, python3, etc. So, although there are other ways to install Python 3.x on Mac without installing the command line developer tools, I recommend you install it because it provides a string of tools for development on Mac. To install the package, click on the Install button, and follow the steps to complete the installation process. Once the installation process is complete, rerun the previous command. Yes, Python 3.x is installed on your Mac.
Install Python 3 with the Official Installer
Downloading the latest Python version from the official Python website (python.org) is the most common (and recommended) method for installing Python on a Mac. Let’s try it out.
1. First, download an installer package from the Python website. To do that, visit https://www.python.org/downloads/ on your Mac; it detects your operating system automatically and shows a big button for downloading the latest version of the Python installer on your Mac. If it doesn’t, click the macOS link and choose the latest Python release.
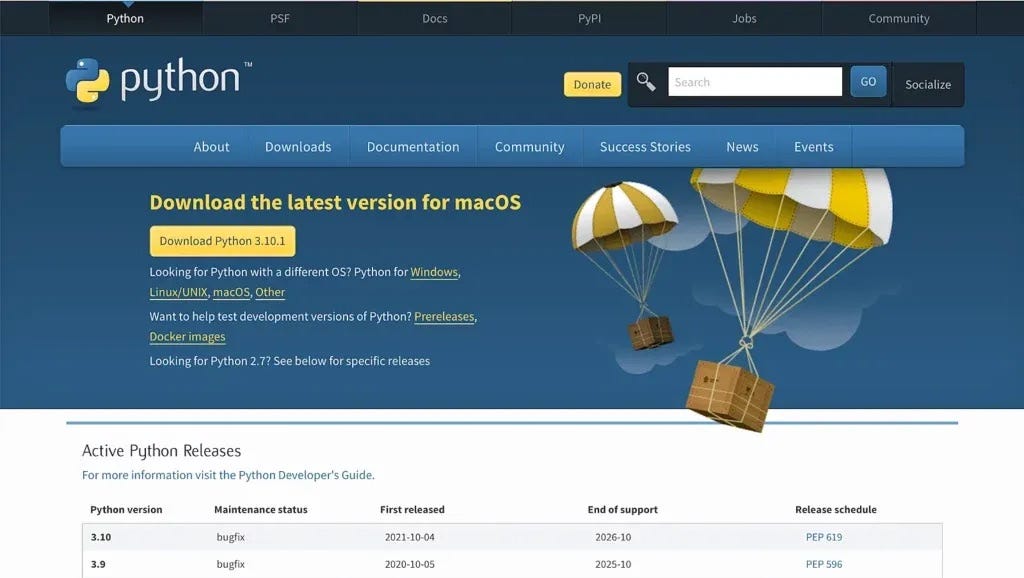
2. Once the download is complete, double-click the package to start installing Python. The installer will walk you through a wizard to complete the installation, and in most cases, the default settings work well, so install it like the other applications on macOS. You may also have to enter your Mac password to let it know that you agree with installing Python.
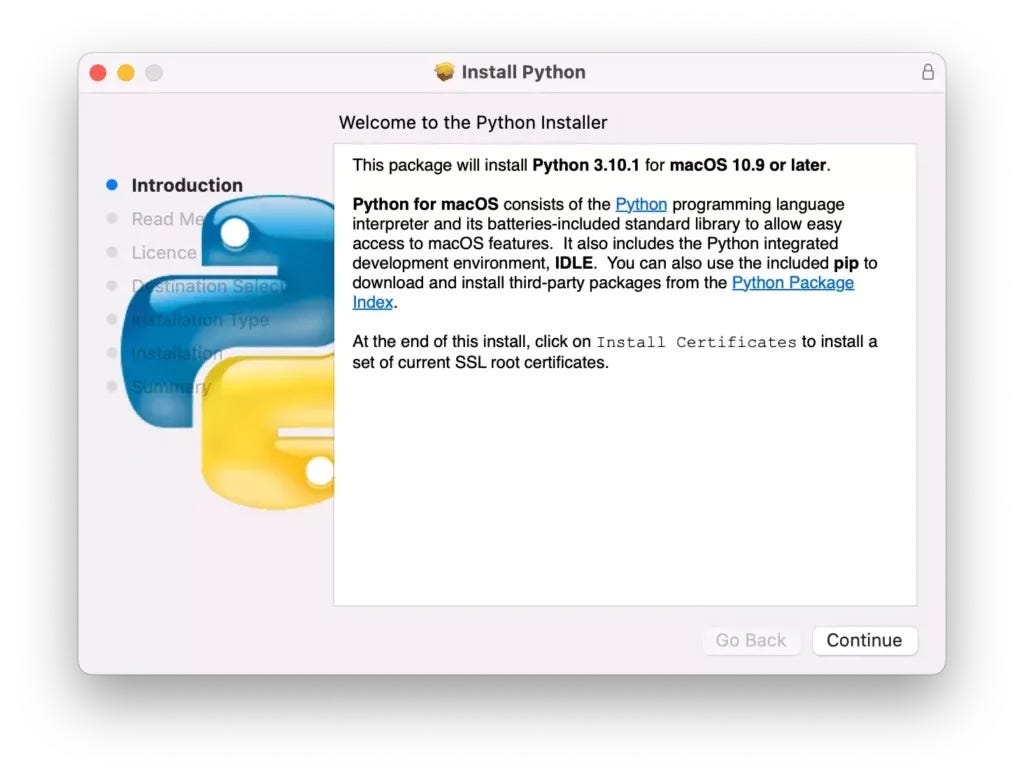
NOTE
If you’re using Apple M1 or M2 Mac, you need to install Rosetta. Rosetta enables Intel-based features to run on Apple silicon Macs.
3. When the installation completes, it will open up the Python folder.
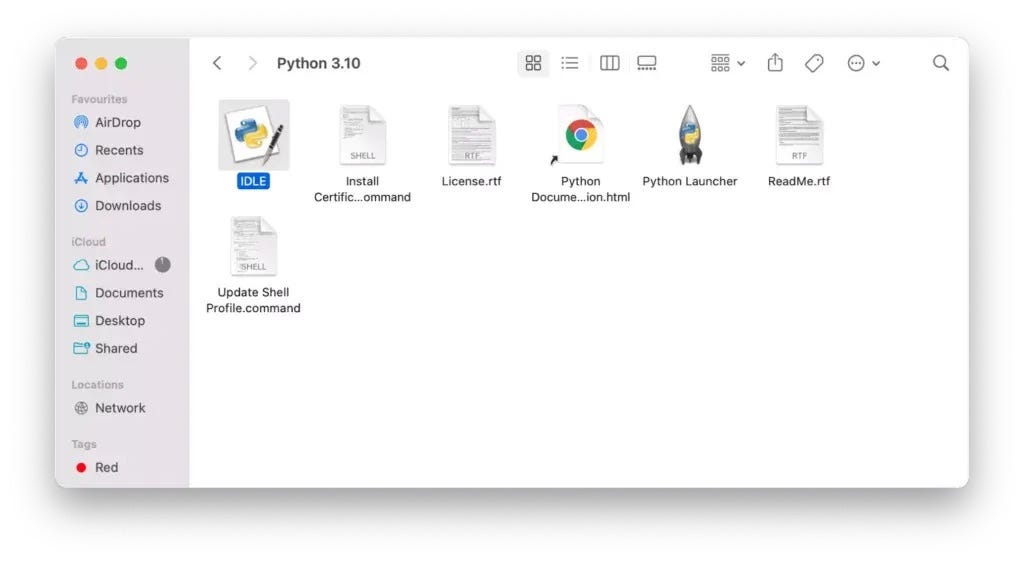
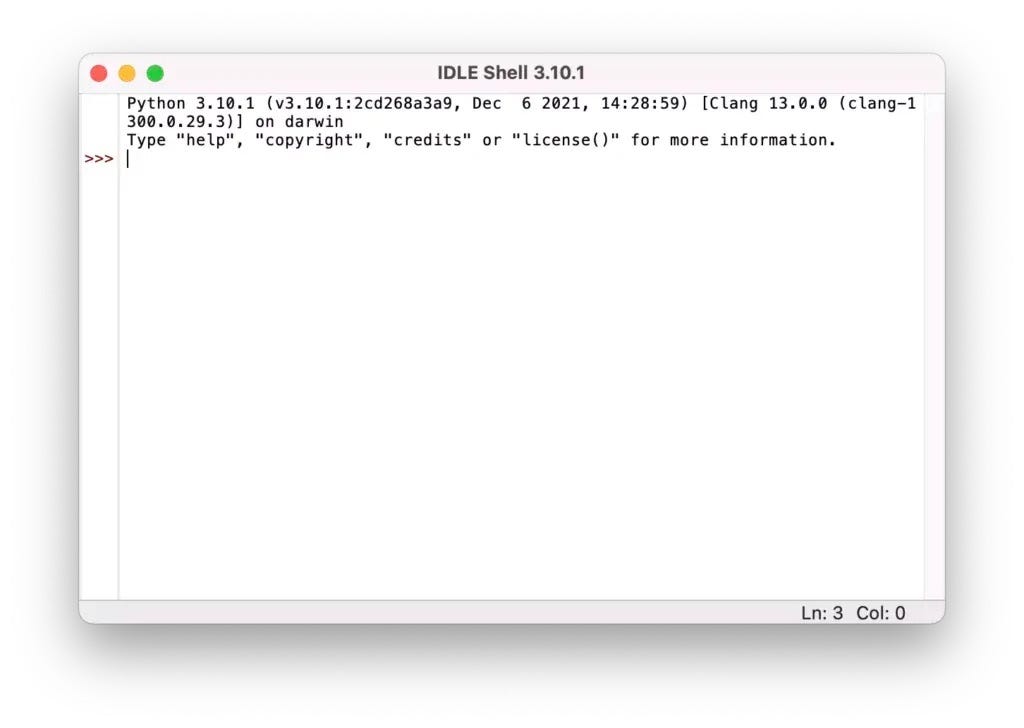
4. Let’s verify that the latest version of Python and IDLE are installed correctly. To do that, double-click IDLE, which is the integrated development environment shipped with Python. If everything works correctly, IDLE shows the Python shell as follows:
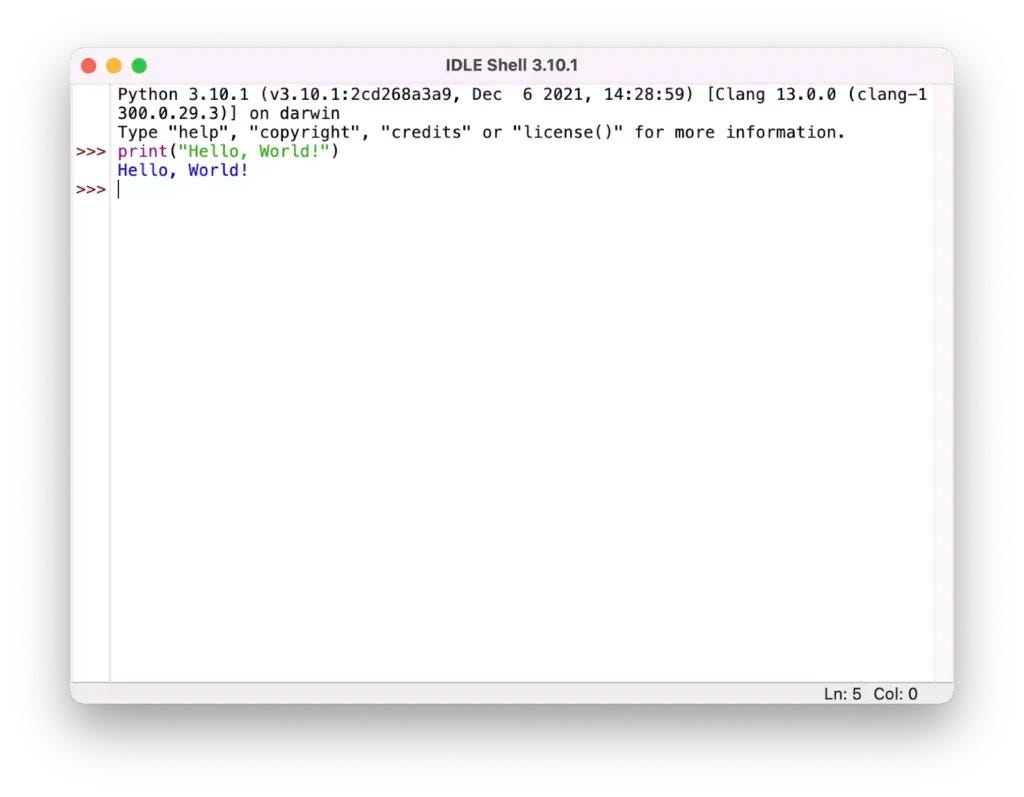
5. Let’s write and run a simple Python code in IDLE. Type the following statement, and hit the return key.
print("Hello, World!")
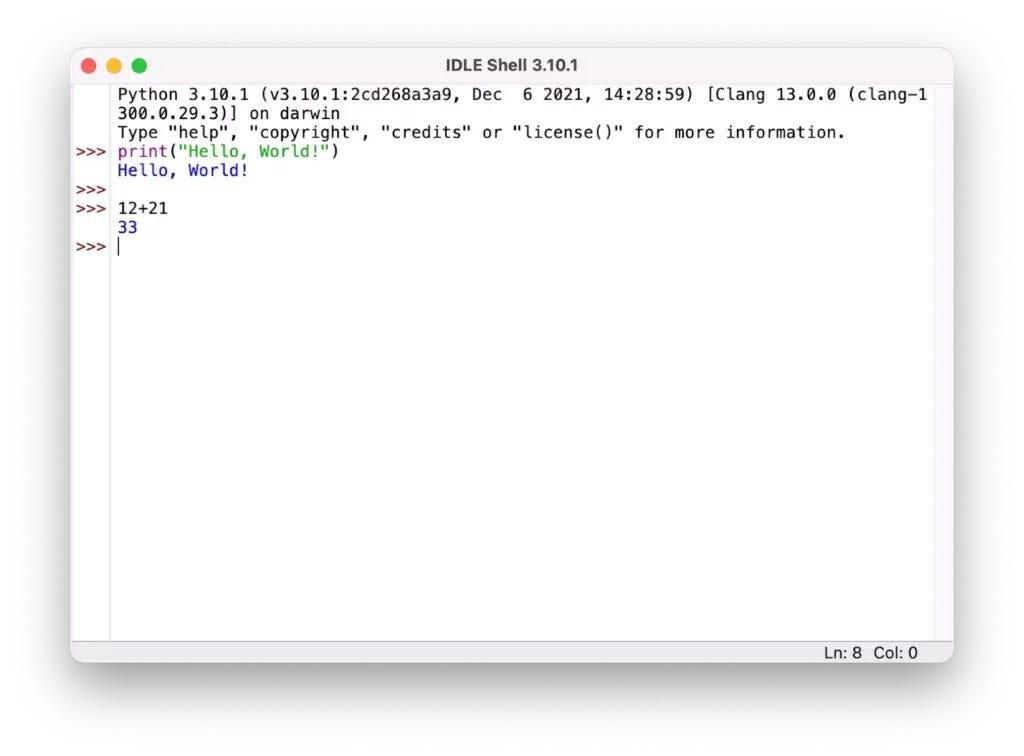
Or let’s do a basic calculation in Python as follows:
NOTE
The exciting advantage of this installation method is that you can easily update an outdated Python install by downloading the latest Python installer. The new version of Python is available on your Mac once the installation is complete.
Installing Visual Studio Code on Mac
Although we can use IDLE or the terminal application to write Python scripts, we prefer a powerful, extensible, and lightweight code editor rather than rigid coding environments. In this part of the tutorial, we’re going to install Visual Studio Code for Python development on macOS.
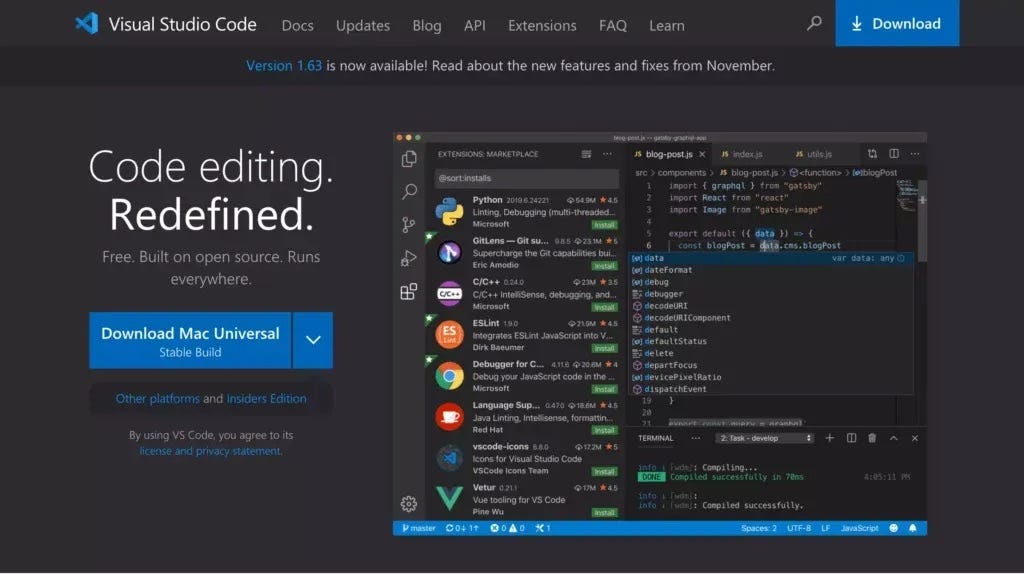
1. First, you need to download Visual Studio Code for macOS from its official website at https://code.visualstudio.com/.
2. Double-click the downloaded file to extract the archived contents.
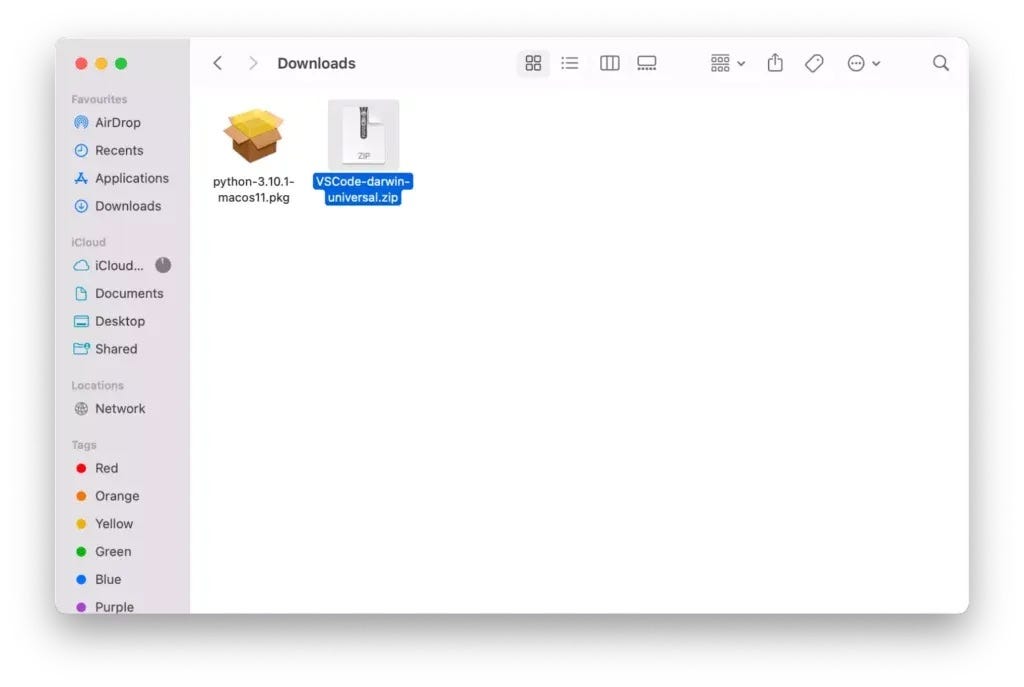
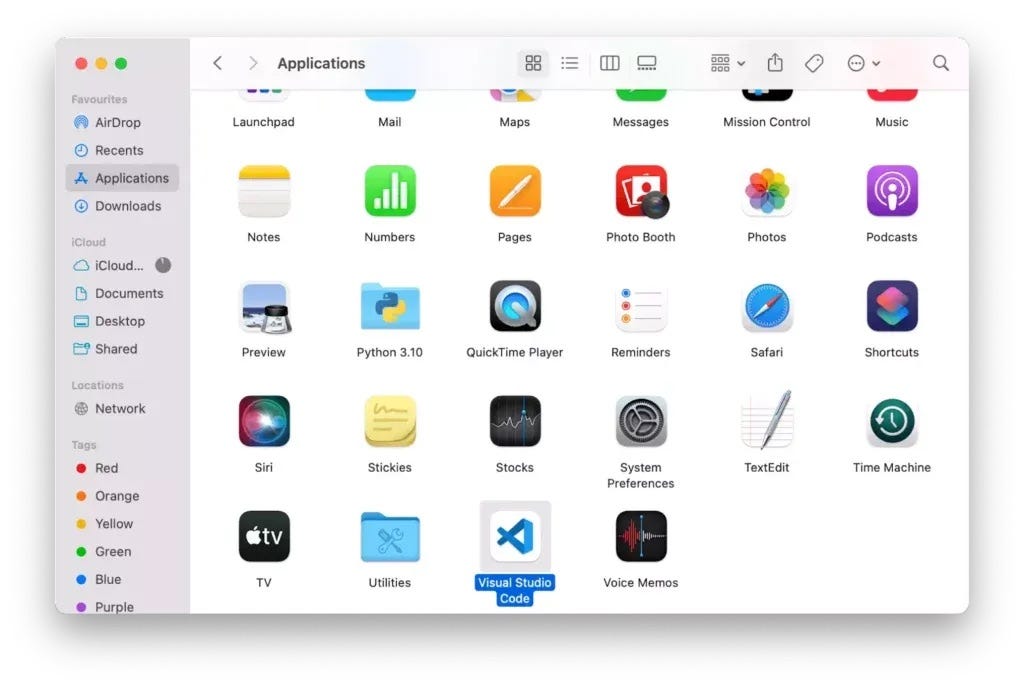
3. Move the Visual Studio Code application to the Application folder to make it available in the macOS launchpad.
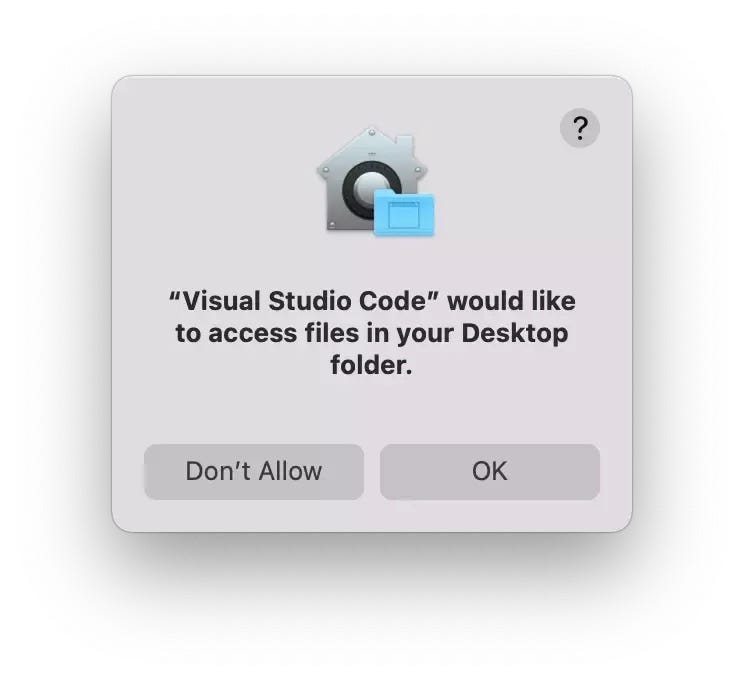
4. Launch Visual Studio Code, and then open a folder where your Python scripts exist (or create a new one). For example, create a new folder on your Desktop, and name it py_scripts, then try to open the folder on VS Code. Usually, VS Code needs your permission to access files in your Desktop folder; click OK.
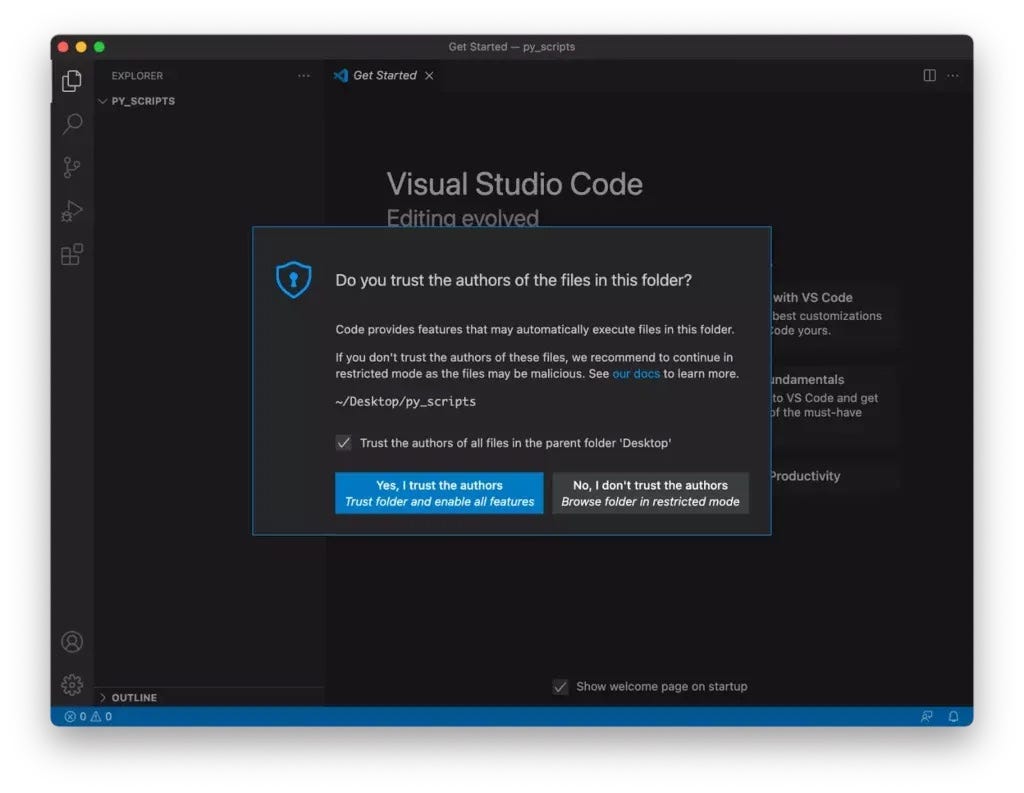
Also, you may need to declare that you trust the authors of the files stored in your Desktop folder.
5. Create a new file with a .py extension. For example, create a new file, and name it prog_01.py. VS Code detects the .py extension and wants to install a Python extension.
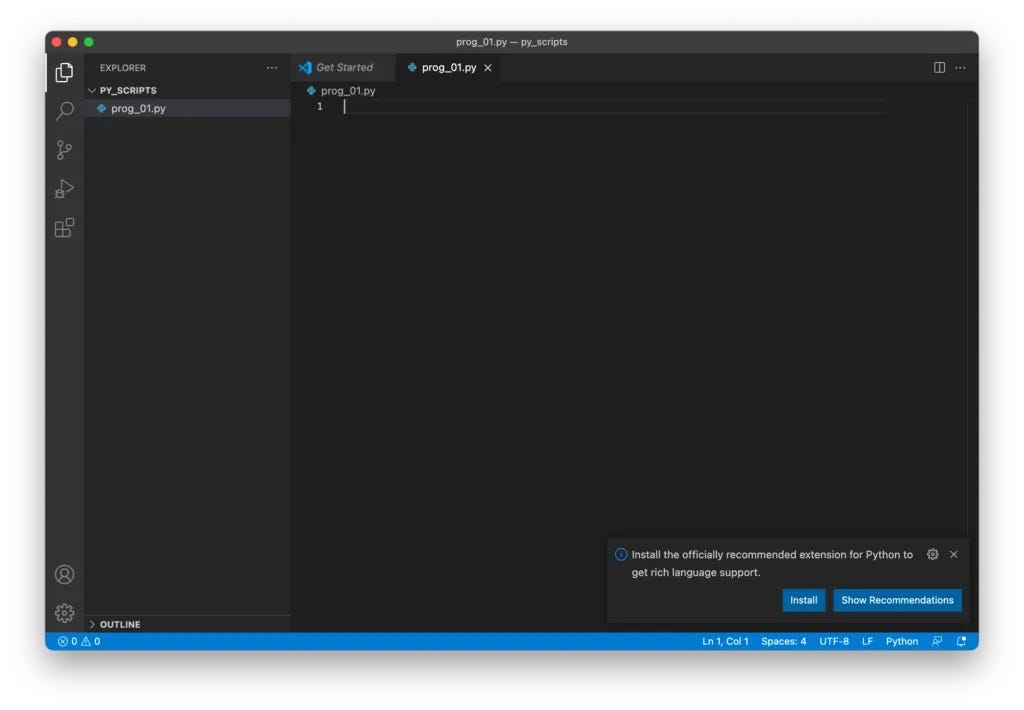
To work with Python inside VS Code, we need to use the Python extension, which includes many useful features, such as code completion with IntelliSense, debugging, unit testing support, etc.
Install it by clicking on the Install button.
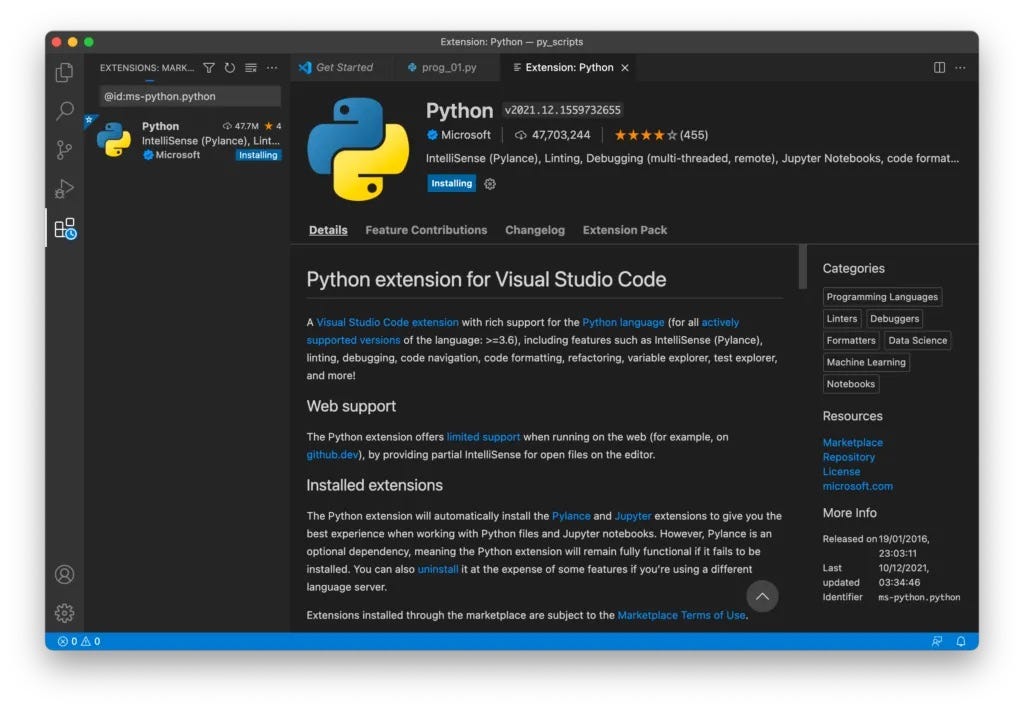
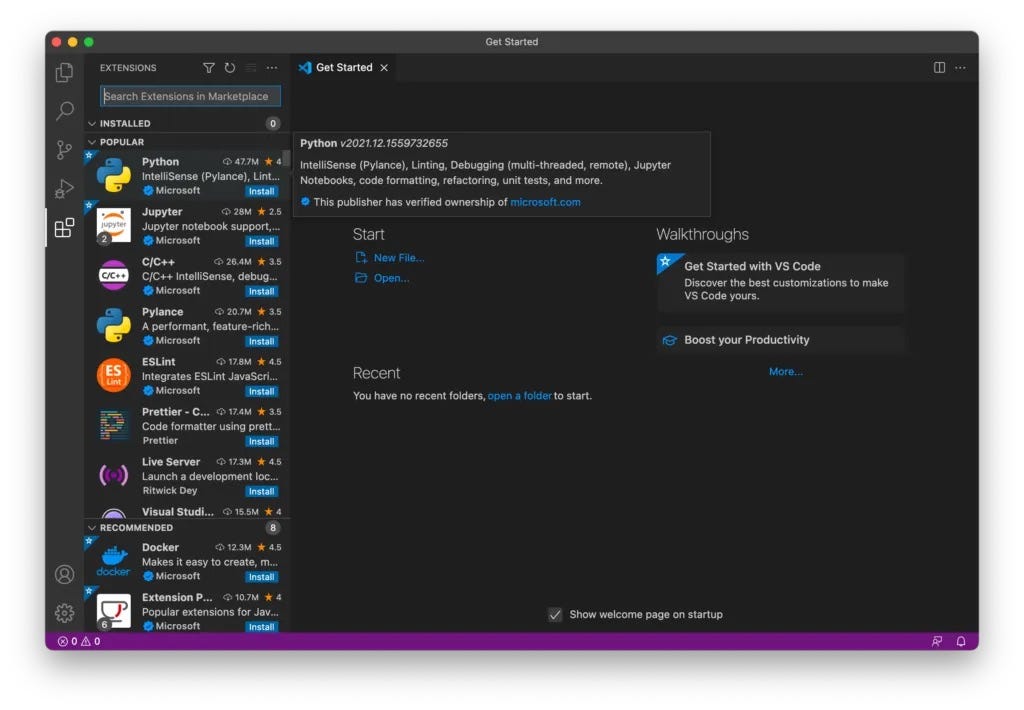
We can also install the Python extension by browsing extensions. Click on the Extensions icon on the left side of VS Code.

This will show you a list of the most popular VS Code extensions on the VS Code Marketplace. Now, we can select the Python extension and install it.
6. Once the extension is installed, you have to select a Python interpreter. Click on the Select Python Interpreter button:
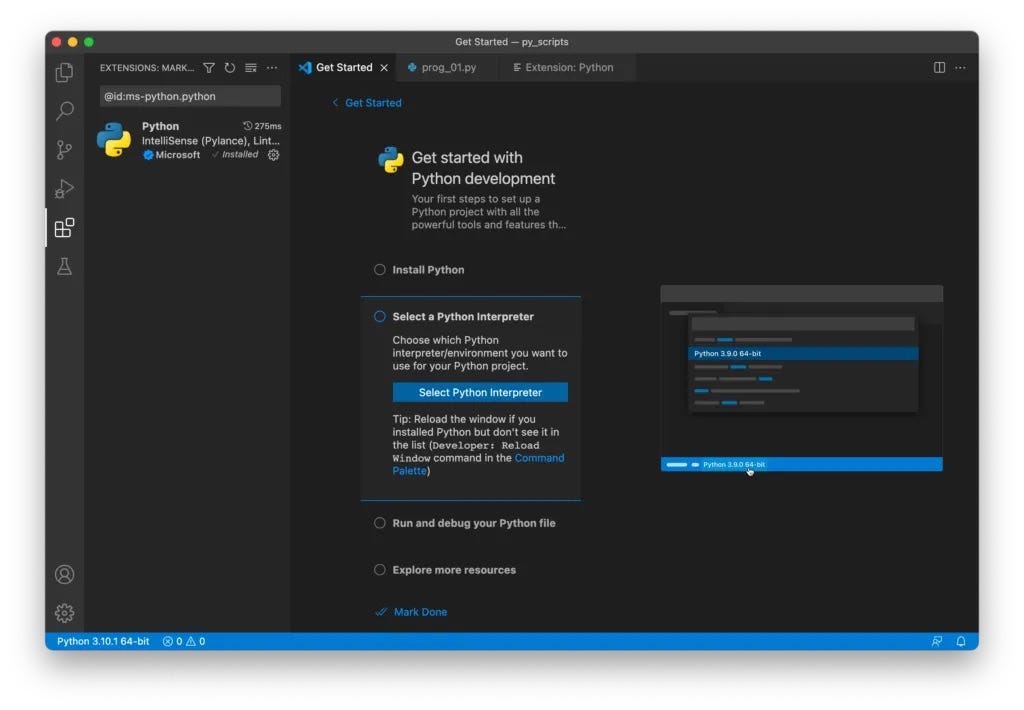
Then select the recommended Python interpreter on the list.
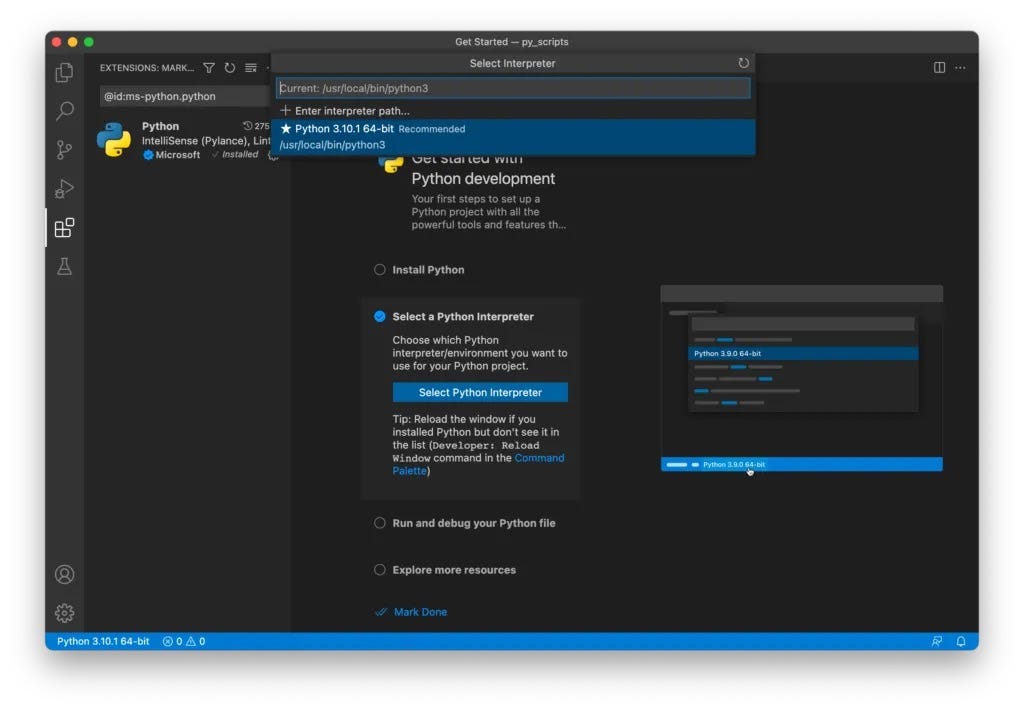
If you have multiple Python versions installed on your Mac, choosing the latest version is better.
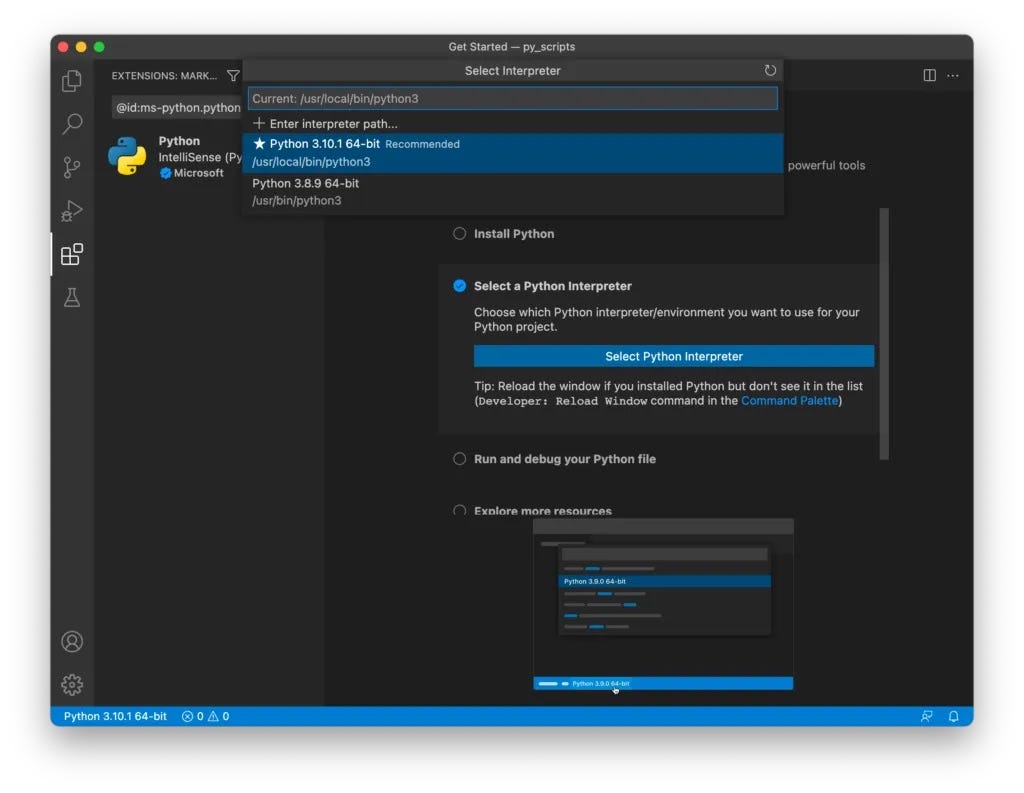
You also can select a Python interpreter using the Python: Select Interpreter command from the Command Palette. To do so, press CMD + SHIFT + P, type Python, and choose Select Interpreter.
Running Our First Python Script on Mac
Excellent, we have everything we need to write and run our Python code inside VS Code. Let’s write the following code in VS Code and then run it.
print("Hello, World!) name = input("What's your name? ") print("Hello {}!\nWelcome to Data Tweets!".format(name))
Run the code by clicking the ▶️ button at the top right corner of VS Code. First, it shows Hello, World! in the integrated terminal, then it asks for your name; enter your name, and hit return. It outputs Hello <your name,>, and writes Welcome to Data Tweets! on the next line.
Conclusion
In this lesson, we learned how to install the latest version of Python on Mac and Windows and update an outdated version. Additionally, we learned how to install Visual Studio Code as a code editor and configure it for running Python scripts. Finally, we wrote a small Python script in VS Code and ran it successfully.