When you decided to work with PostgreSQL databases, you probably used graphical user interfaces such as PGAdmin, DBeaver, or even paid ones like DataGrip. These software applications provide user-friendly interfaces to work more effectively with databases and definitely make database management much easier for database administrators. But there’s a robust set of tools called PostgreSQL Client Applications that truly will leverage your efficiency while working with PostgreSQL databases. The good news is that these valuable tools are bundled and come with the PostgreSQL installation package for free.

The PostgreSQL Client Applications bring a rapid and powerful set of command-line tools on the table to make interacting with the PostgreSQL servers across platforms, local or remote, more exciting.
In this tutorial, we are going to discover the PostgreSQL Client Applications and learn how to make the most of them by discussing ten of the most useful command-line tools.
After you finish this tutorial, you’ll have a good understanding of
- What PostgreSQL Client Applications are
We assume you know the fundamentals of SQL, including the basics of working with database management systems. If you’re unfamiliar with these or eager to brush up on your SQL skill, you might like to try our SQL Fundamentals Skill Path — Dataquest. We also assume you have already installed PostgreSQL on your computer; if you still need to, please refer to the official PostgreSQL website to download and install it. PostgreSQL Downloads
PostgreSQL Client Applications
As mentioned, this bundle contains different tools that assist database administrations and data experts in getting the most out of PostgreSQL databases hosted on a local server, across networked servers, or in the cloud platforms. These command-line utilities, available for Windows, MacOS, and Linux operating systems, are designed to work with database objects and manage them. There are particular tool sets for creating and removing databases, roles, and users. There are some valuable tools for making and restoring backups of databases.
However, among these utilities, the pick of the litter is the psql command-line tool that allows us to connect to databases, explore their contents, execute SQL queries, and output the result sets in various formats. This utility is really a game changer for leveraging the capabilities of PostgreSQL.
The psql Client Application
Let’s start exploring the PostgreSQL Client Applications with the psql command-line utility and its different options. But before starting work with this utility, let’s check the PostgreSQL version installed on your local computer by running the following command:
% psql --version
psql (PostgreSQL) 14.5 (Homebrew)
The PostgreSQL version installed on my MacBook is 14.5 which allows me to connect to any PostgreSQL server that’s running version 14.5 or earlier.
1. Connect to a Database
The first step to getting into the psql command-line tool is to get connected to a local or remote PostgreSQL server.
To connect to a PostgreSQL database, you can use the command template:
psql --host HOSTNAME --port PORT --user USERNAME --dbname DATABASE_NAME
The HOSTNAME is a remote server name or its IP address. If the PostgreSQL server is running on your local machine, you must use localhost instead of a server’s IP address.
You also need to identify the communication port with --port. The default communication port is 5432. You may omit the --port PORT argument if the port number is 5432. The --dbname and --username determine the database name to connect to and the username to connect with, respectively.
The following psql command makes a connection to the mydb database with username postgres that resides on the same computer that you are working on, localhost.
% psql --host localhost --port 5432 --dbname mydb --username postgres
Executing the command above opens up a connection to the PostgreSQL server running on your local computer, and the command prompt will be changed as follows:
mydb=#
Now, you are able to run psql’s meta-commands, which we will discuss soon. Meanwhile, let’s close the connection to the PostgreSQL server by typing \q and pressing Enter, which will return you to the operating system command prompt.
mydb=# \q
Meta Commands
The psql utility offers a great feature called meta or backslash commands. These commands or instructions are processed by the psql client application directly and not executed by the PostgreSQL server. The meta-commands provide a variety of options. We will learn more about them in the following sections. One of the meta-commands is \q, which we tried earlier to quit the psql environment. Also, to get a list of all available meta-commands, you can type \? and press Enter.
mydb=# \?
2. The \l Meta-Command
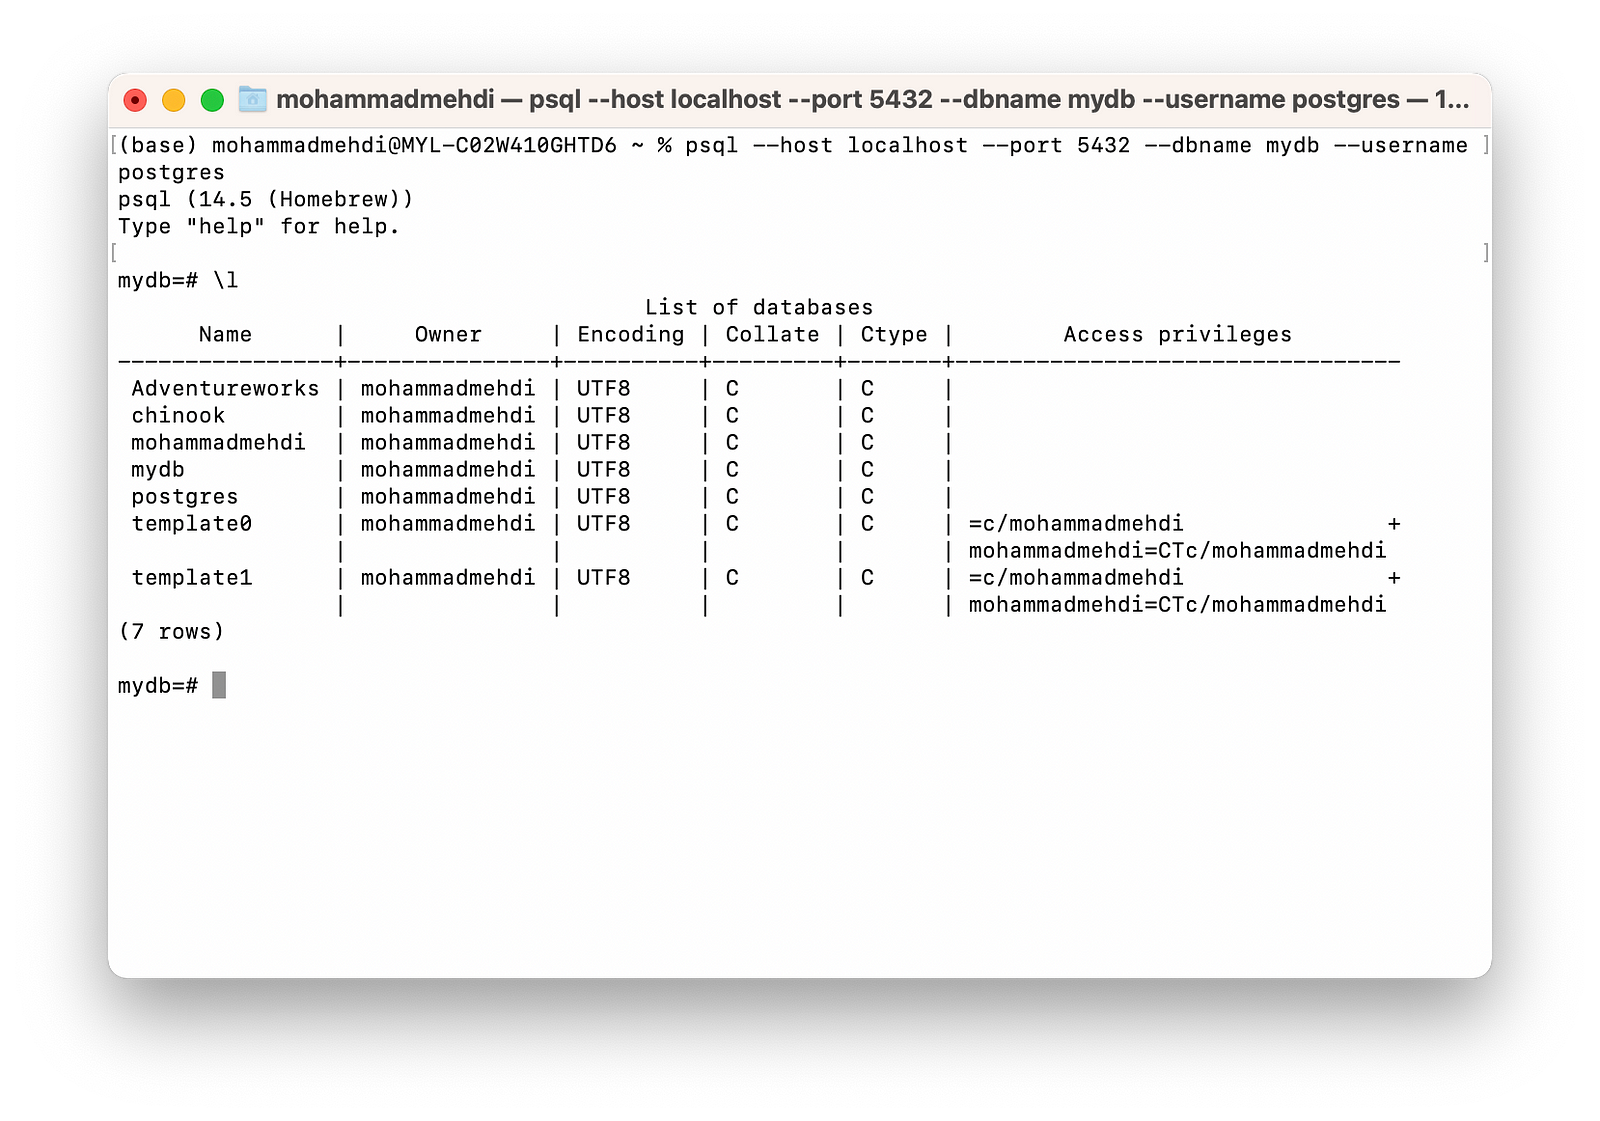
The \l meta-command allows you to list all the databases stored on the PostgreSQL server you are connected to. First, connect to the database server and then run the \l meta-command, as shown in the image below. The command lists all the available databases along with all the details.
3. The \dt Meta-Command
We’ve connected to the mydb database; now we’re interested in listing all the existing tables on this database. To do so, you can use the \dt meta-command as follows:
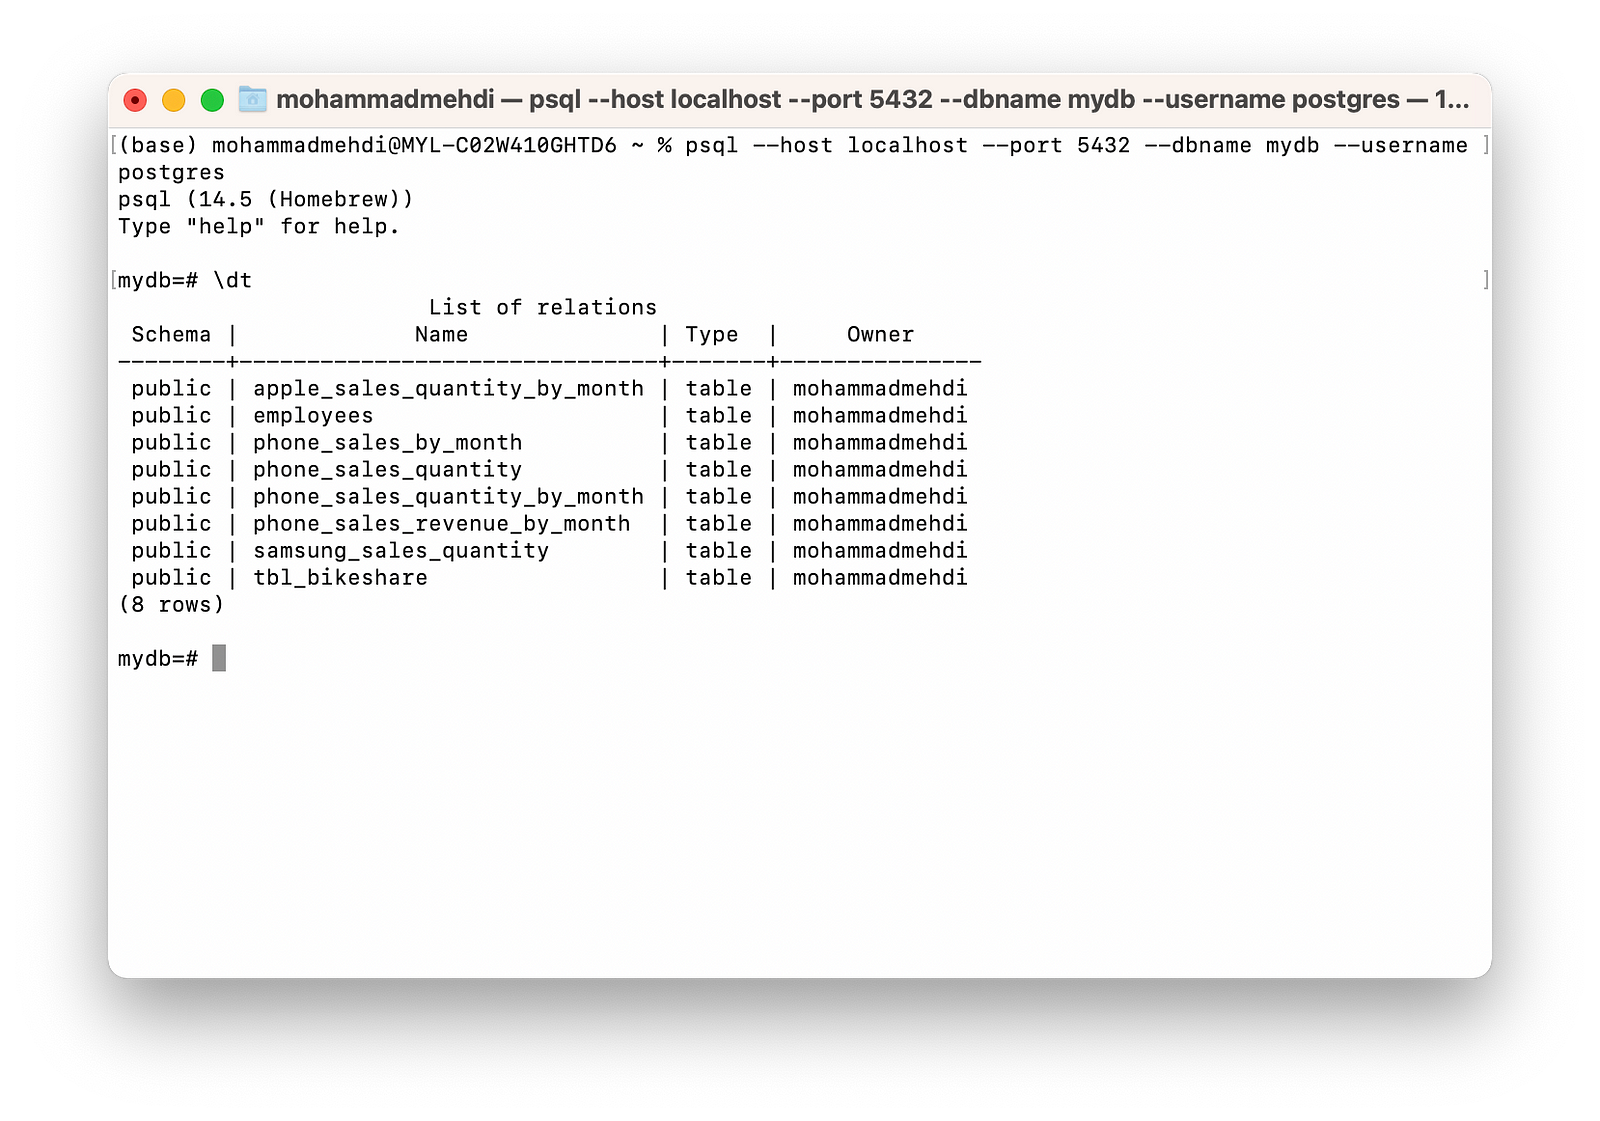
As shown in the image above, all the database’s relations (tables) are listed with useful details such as schema and the owner of tables.
4. The \c Meta-Command
Sometimes we need to change the active database and switch to another one. The \c meta-command allows us to connect to a new database. Let’s try it.
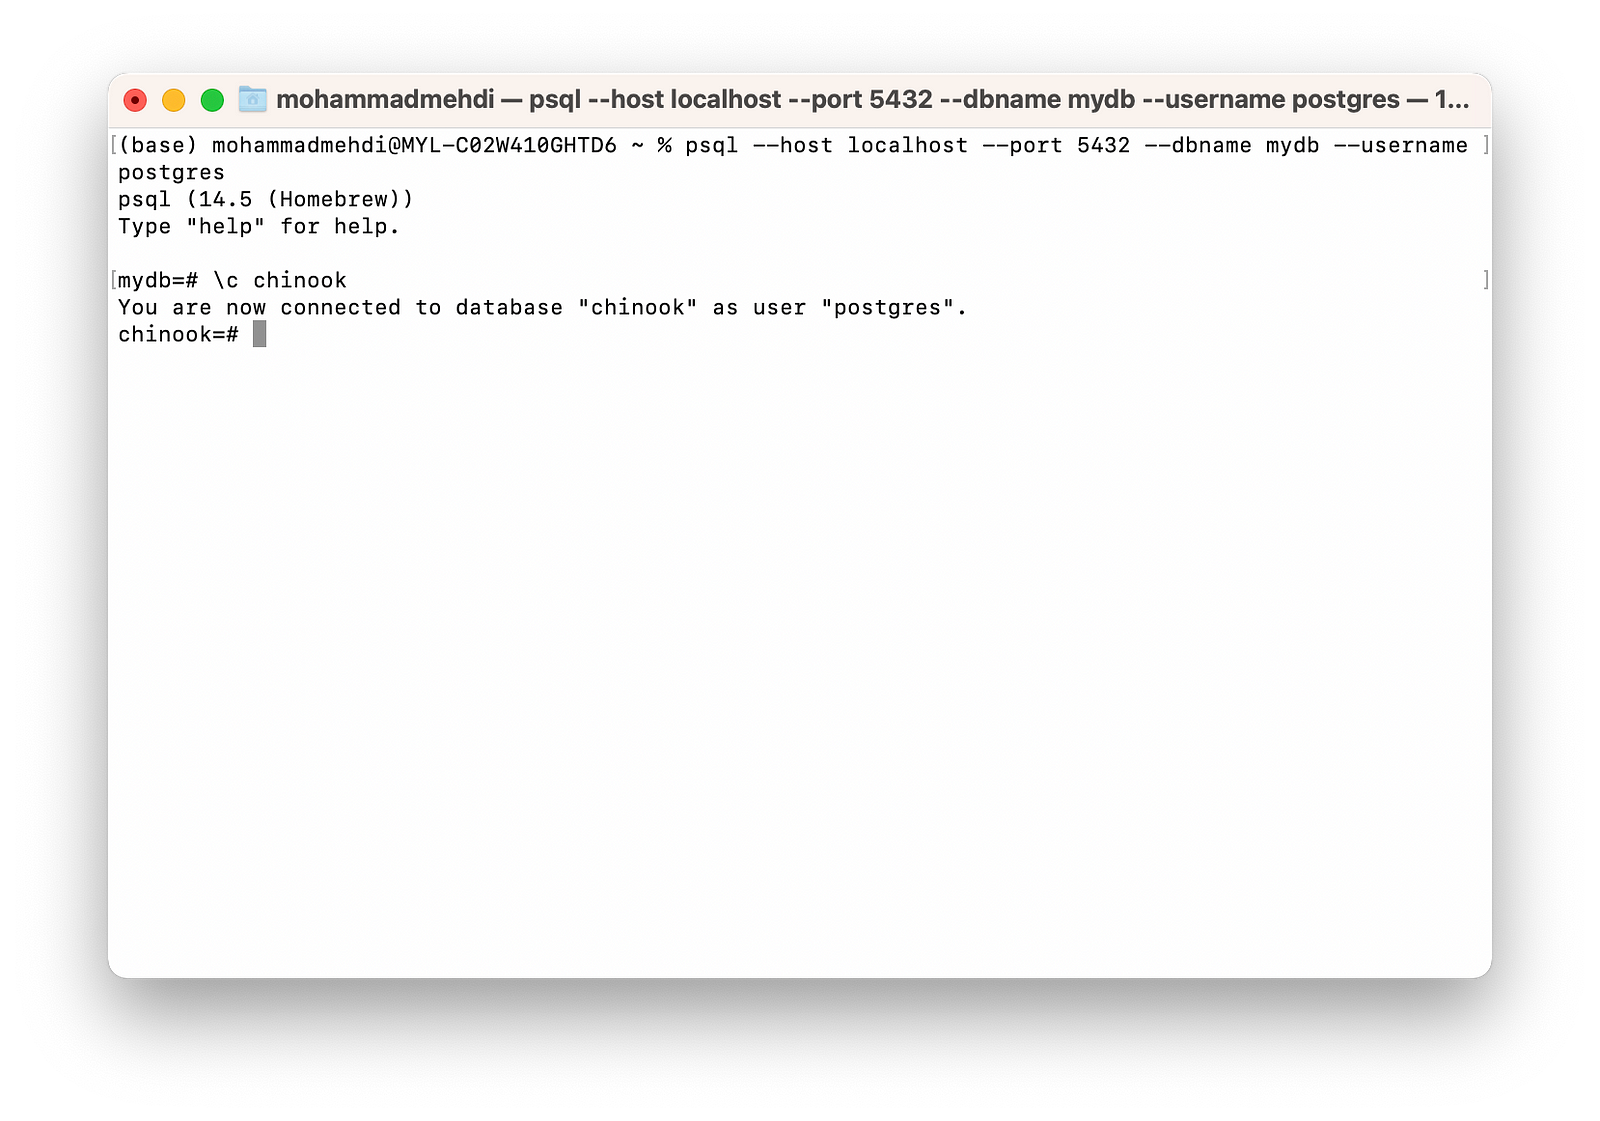
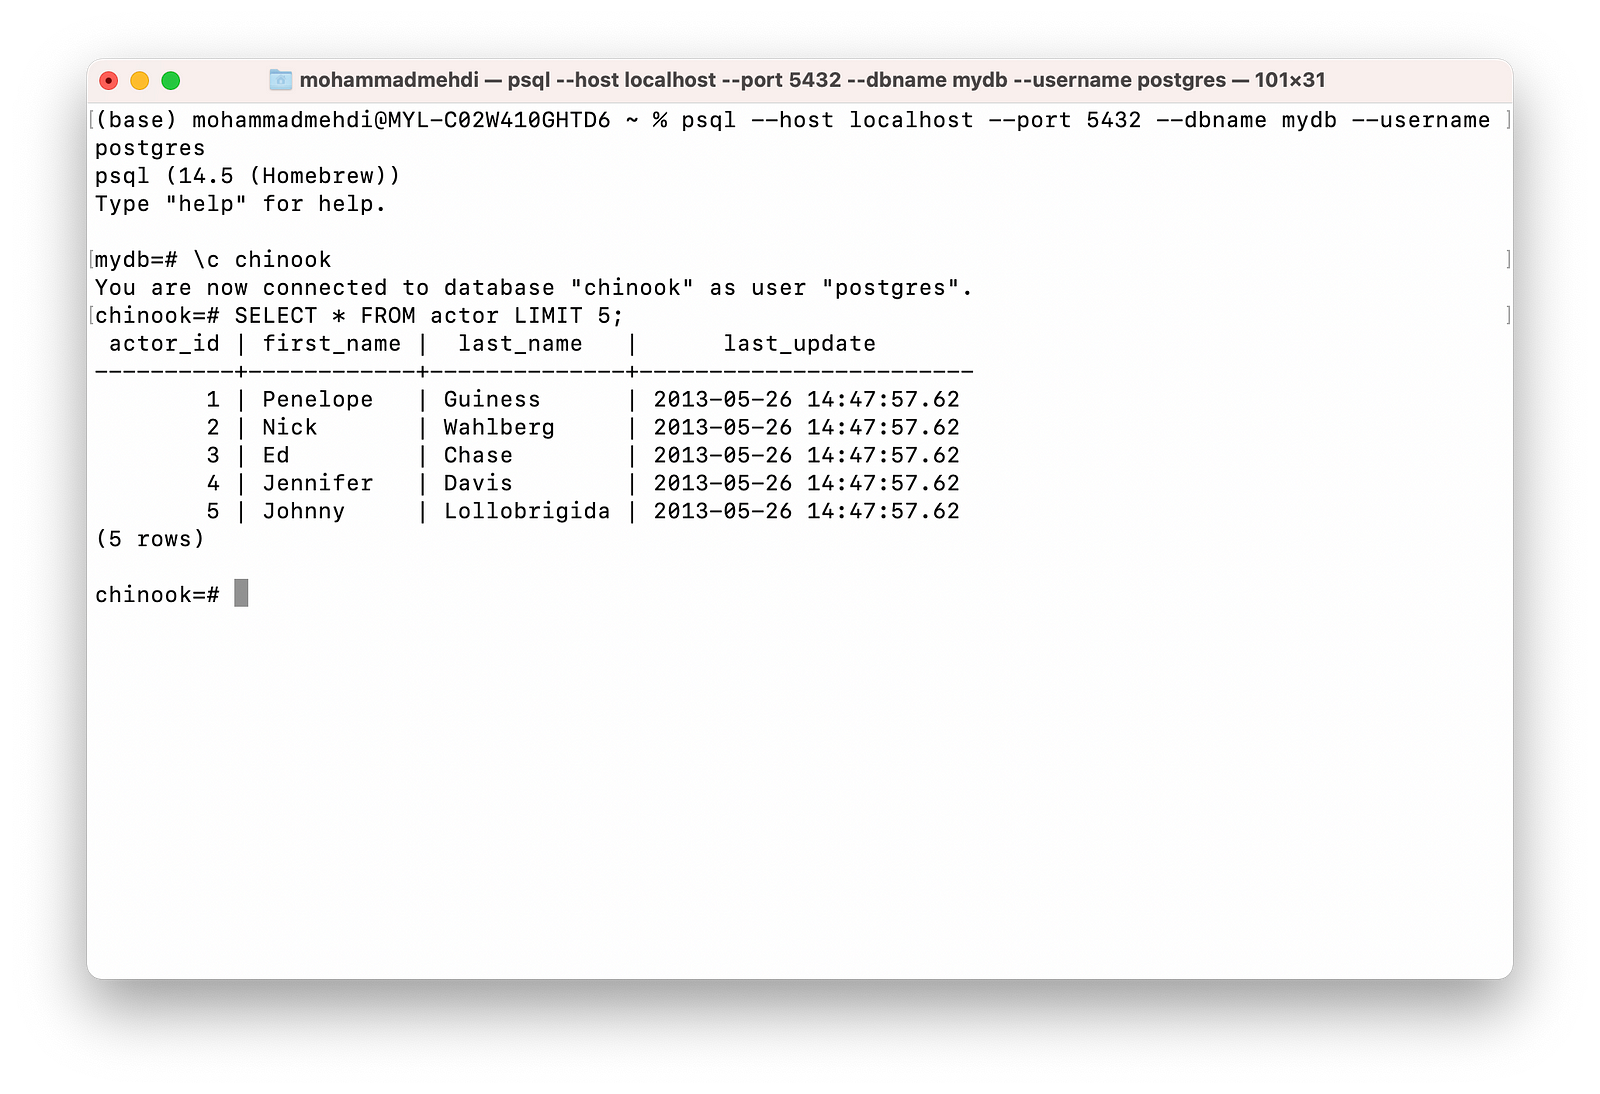
So, we’ve made chinook the active database. Now, we are able to write queries against the database. Let’s see how we can write a simple query against the actor table in the chinook database.
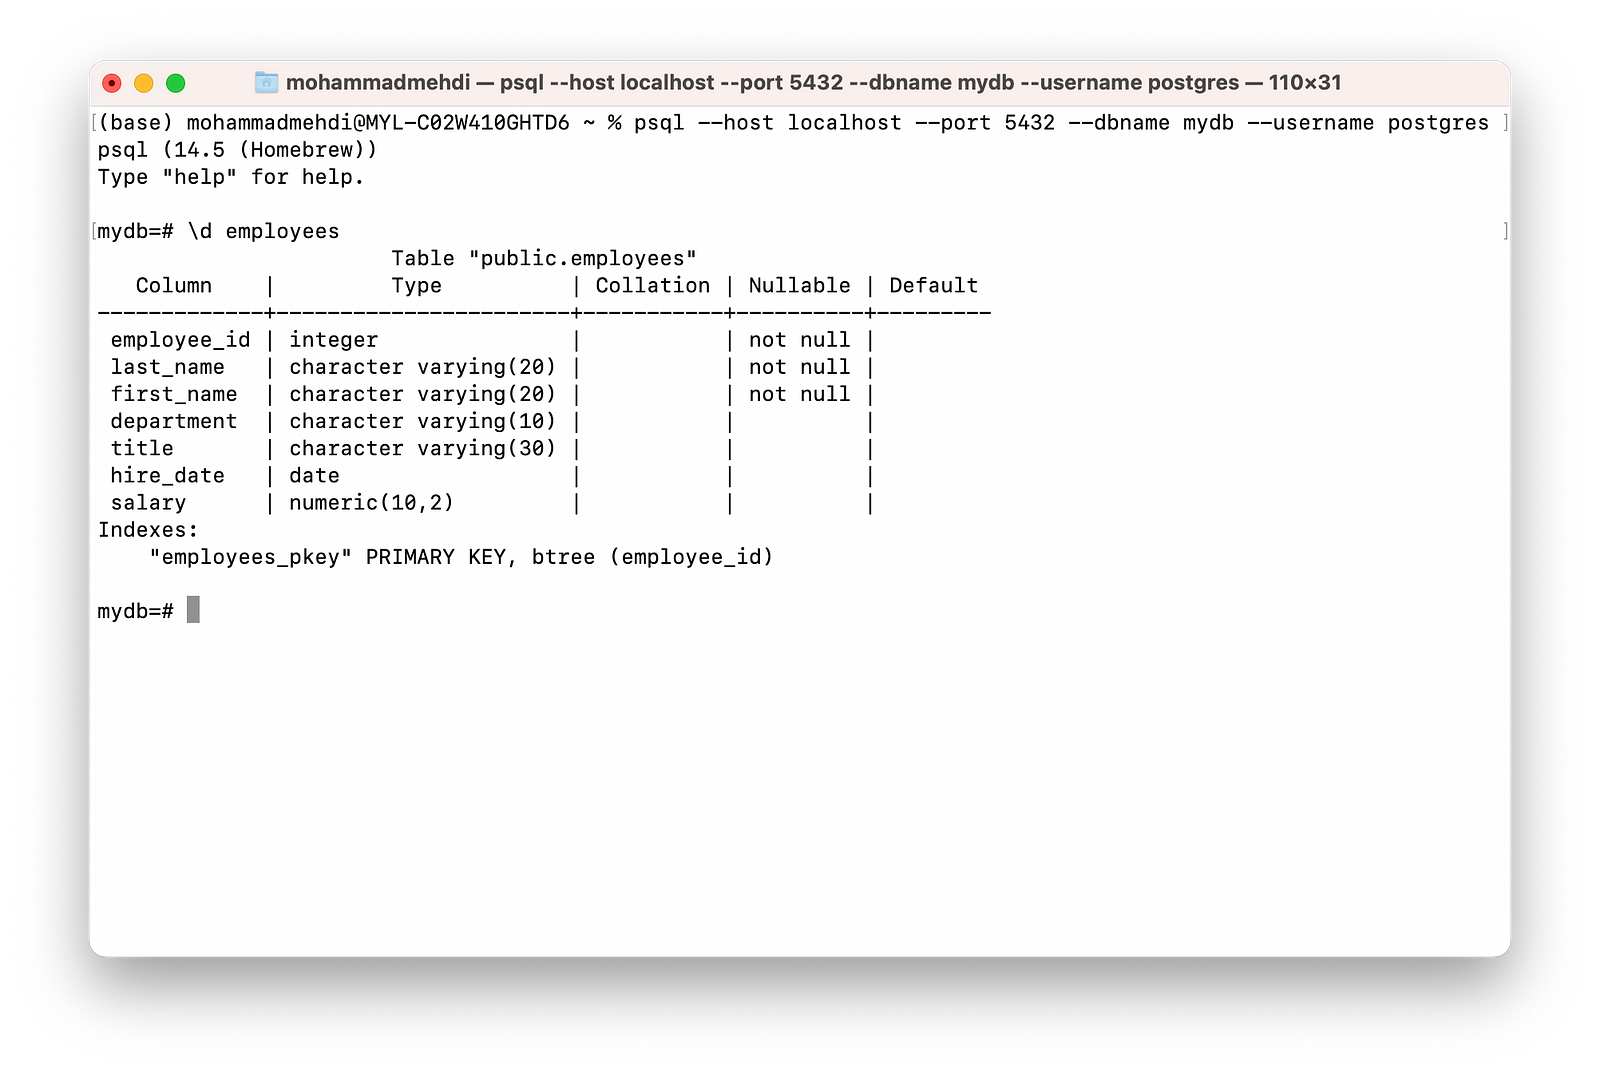
5. The \d Meta-Command
To reveal the details of each relation (table, view, etc.), we can use the \d relation-name meta-command. For example, \d employees returns the table’s columns and their data types along with additional information for each column, as shown below:
6. The \dn Meta-Command
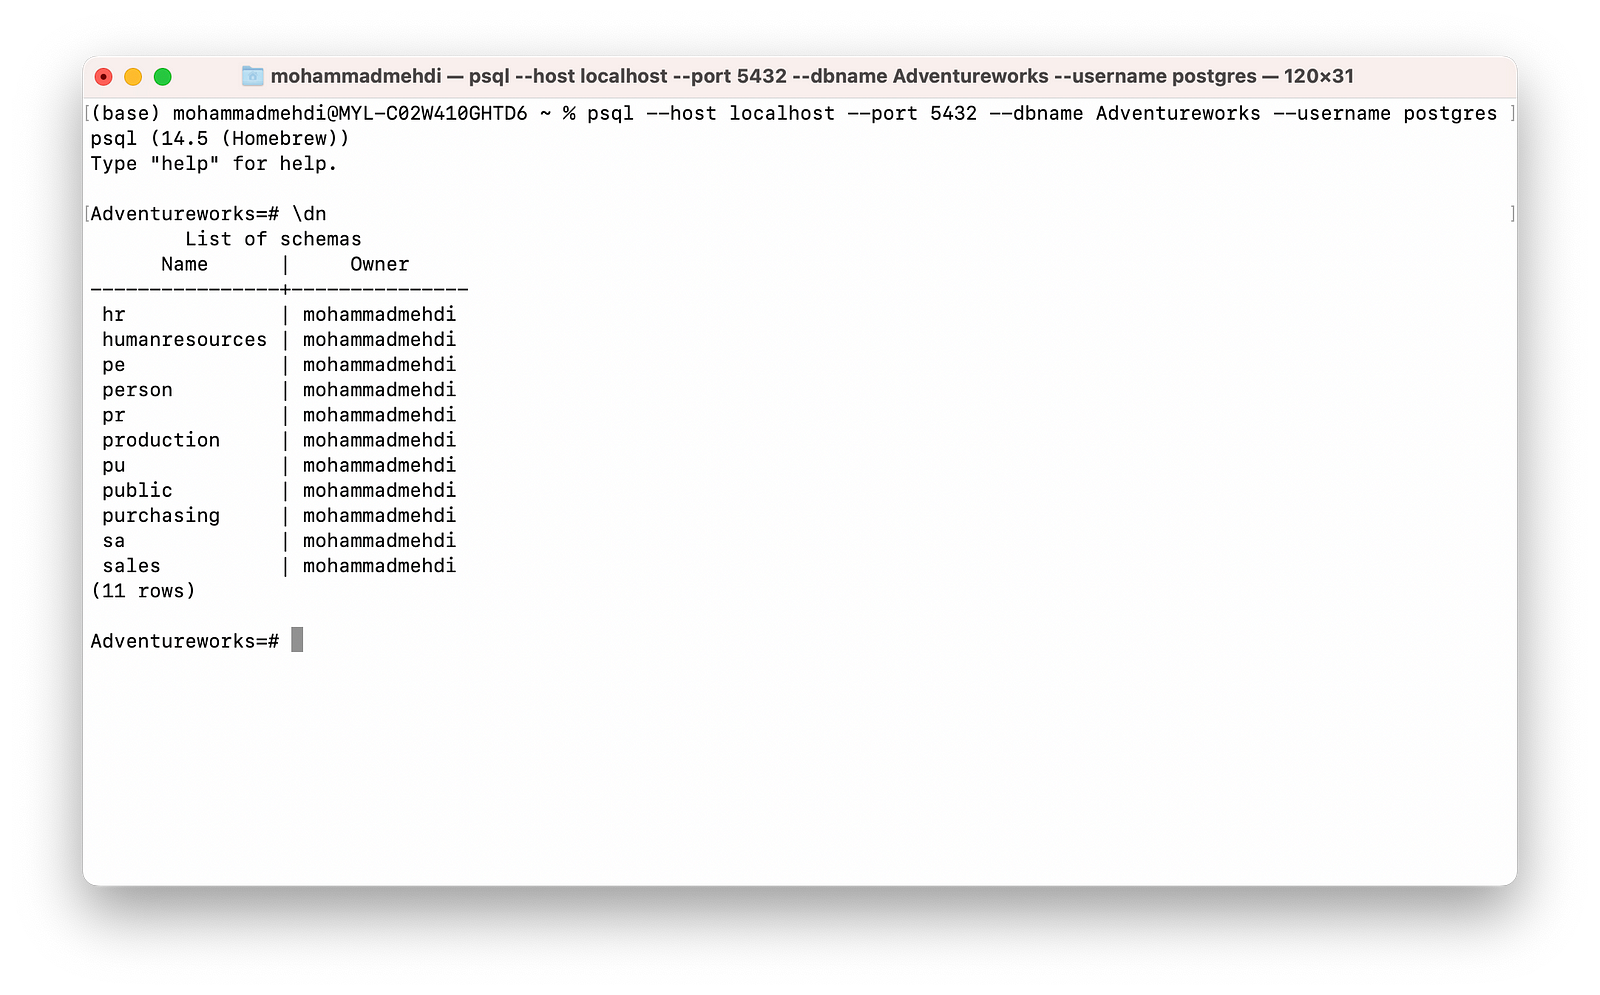
The \dn meta-command allows us to list all the schemas existing in a PostgreSQL database. To see the output of this meta-command, let’s connect to the Adventureworks database and list all the existing schemas using the \dn meta-command.
7. The \df Meta-Command
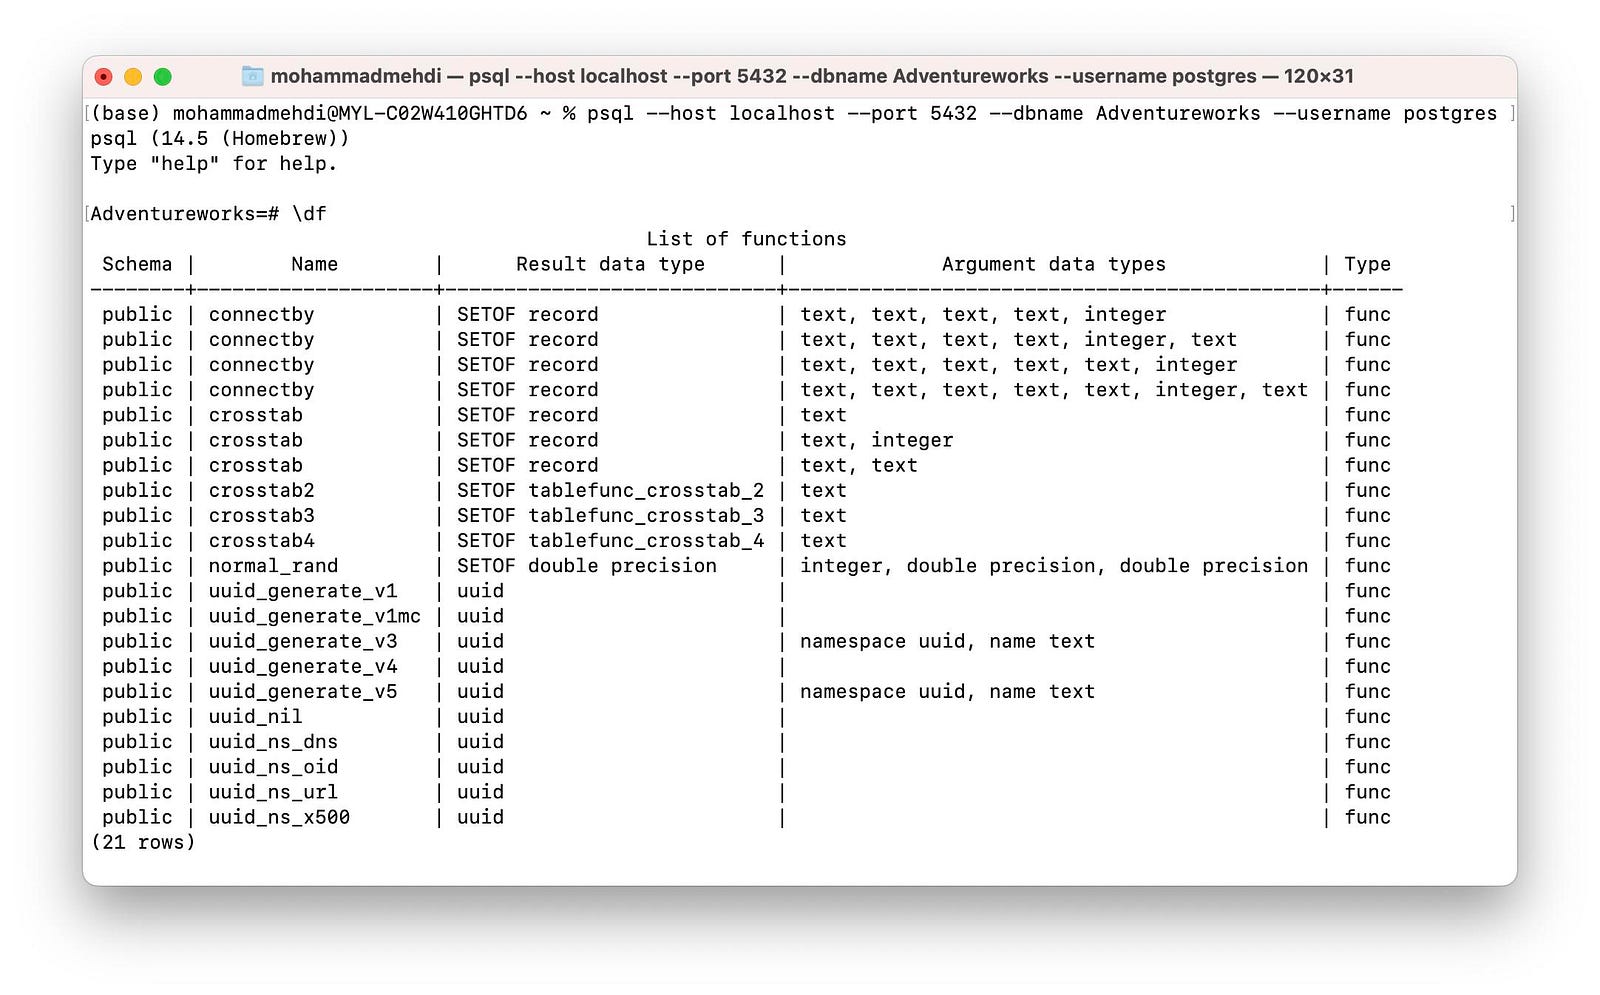
The \df meta-command returns all the available functions of the current database. First, connect to the Adventureworksdatabase, type \df, and press Enter to see how it works. It will show all the functions existing in the Adventureworksdatabase.
8. The \dv Meta-Command
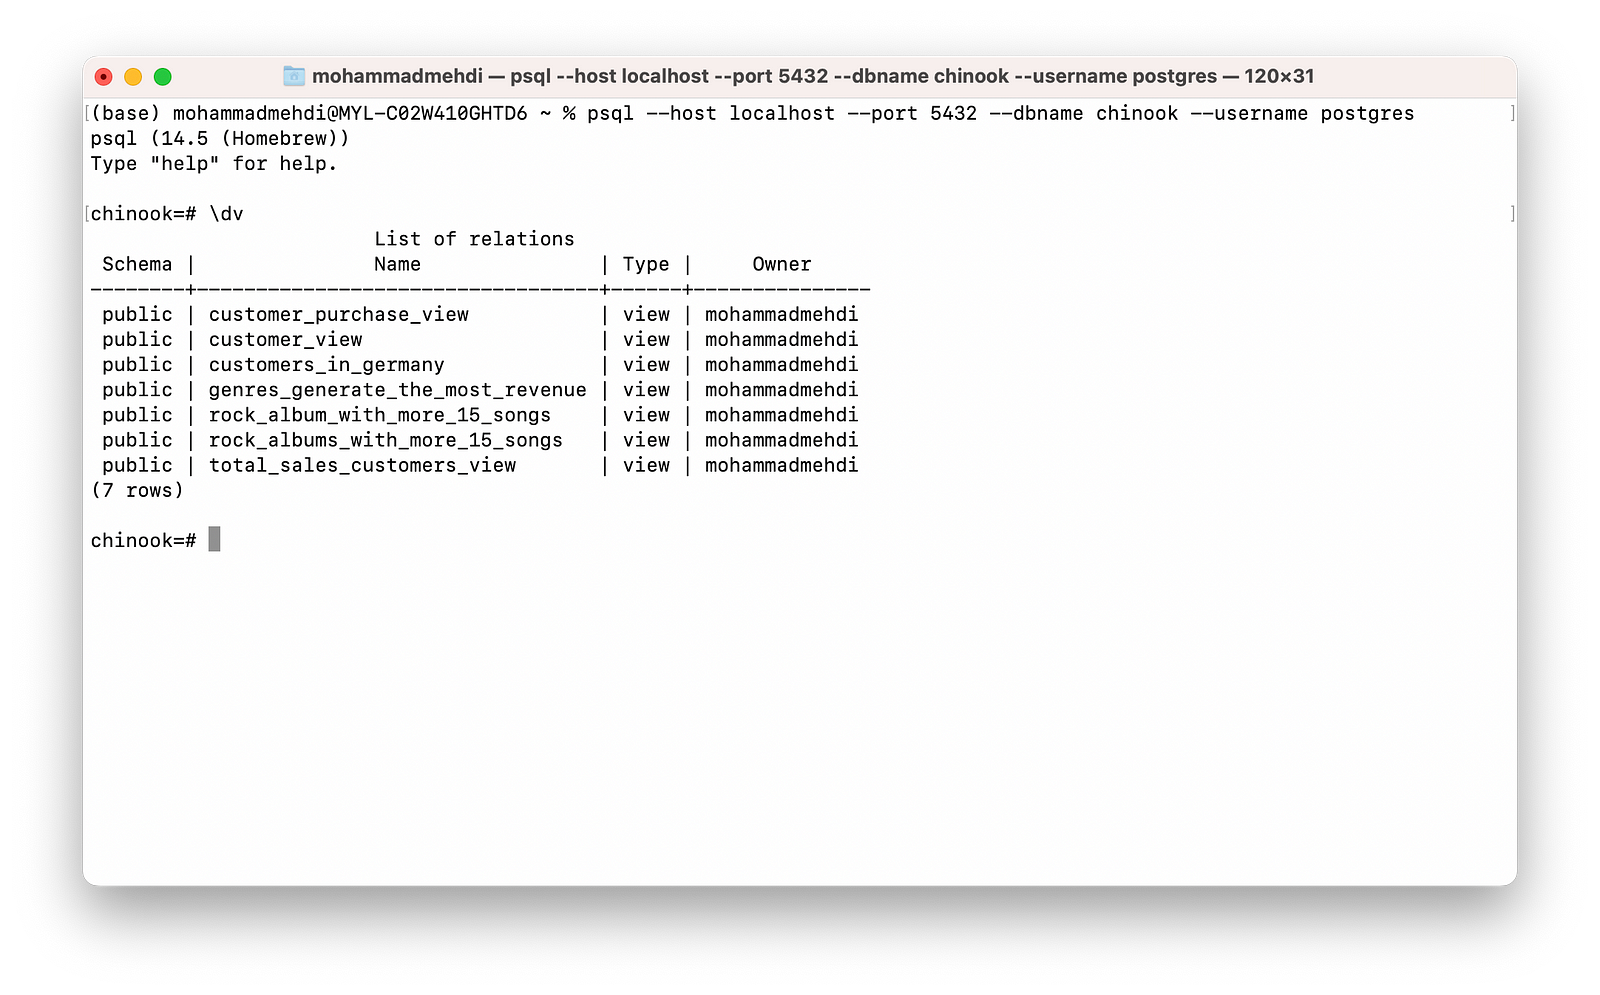
The \dv meta-command is another useful psql’s backslash-command that enables us to list all the views in the current database. For example, we can use this meta-command after connecting to the database to show the available views in the chinook database.
NOTE
The psql client application has dozens of meta-commands, and discussing them is beyond this tutorial’s scope. If you’re interested in learning more about these meta-commands, please refer to the following link on PostgreSQl’s documentation portal.
https://www.postgresql.org/docs/current/app-psql.html ___
Backup and Restore PostgreSQL Databases
So far, we have focused on using the psql client application. But there are some additional utilities bundled with PostgreSQL that make life easier for database administrators and data engineers, especially for those data experts who work on database maintenance tasks.
9. The pg_dump Client Application
The pg_dump client application generates a file with SQL commands to make a backup of a database. If we run these SQL statements, exactly the same database with the same content will be recreated.
The following statement makes a text file containing all the SQL statements required for recreating the mydb database.
% pg_dump mydb > dump_file.sql
10. Restoring Plain-Text Backups
Restoring a database from a plain-text file generated by the pg_dump client application is simple. Most of the database experts use the psql utility with the following options to recreate a database that we have a backup file of it in the plain-text format:
% createdb mydb_restored
% psql --host localhost --dbname mydb_restored --username postgres --file /Users/mohammadmehdi/dump_file.sql
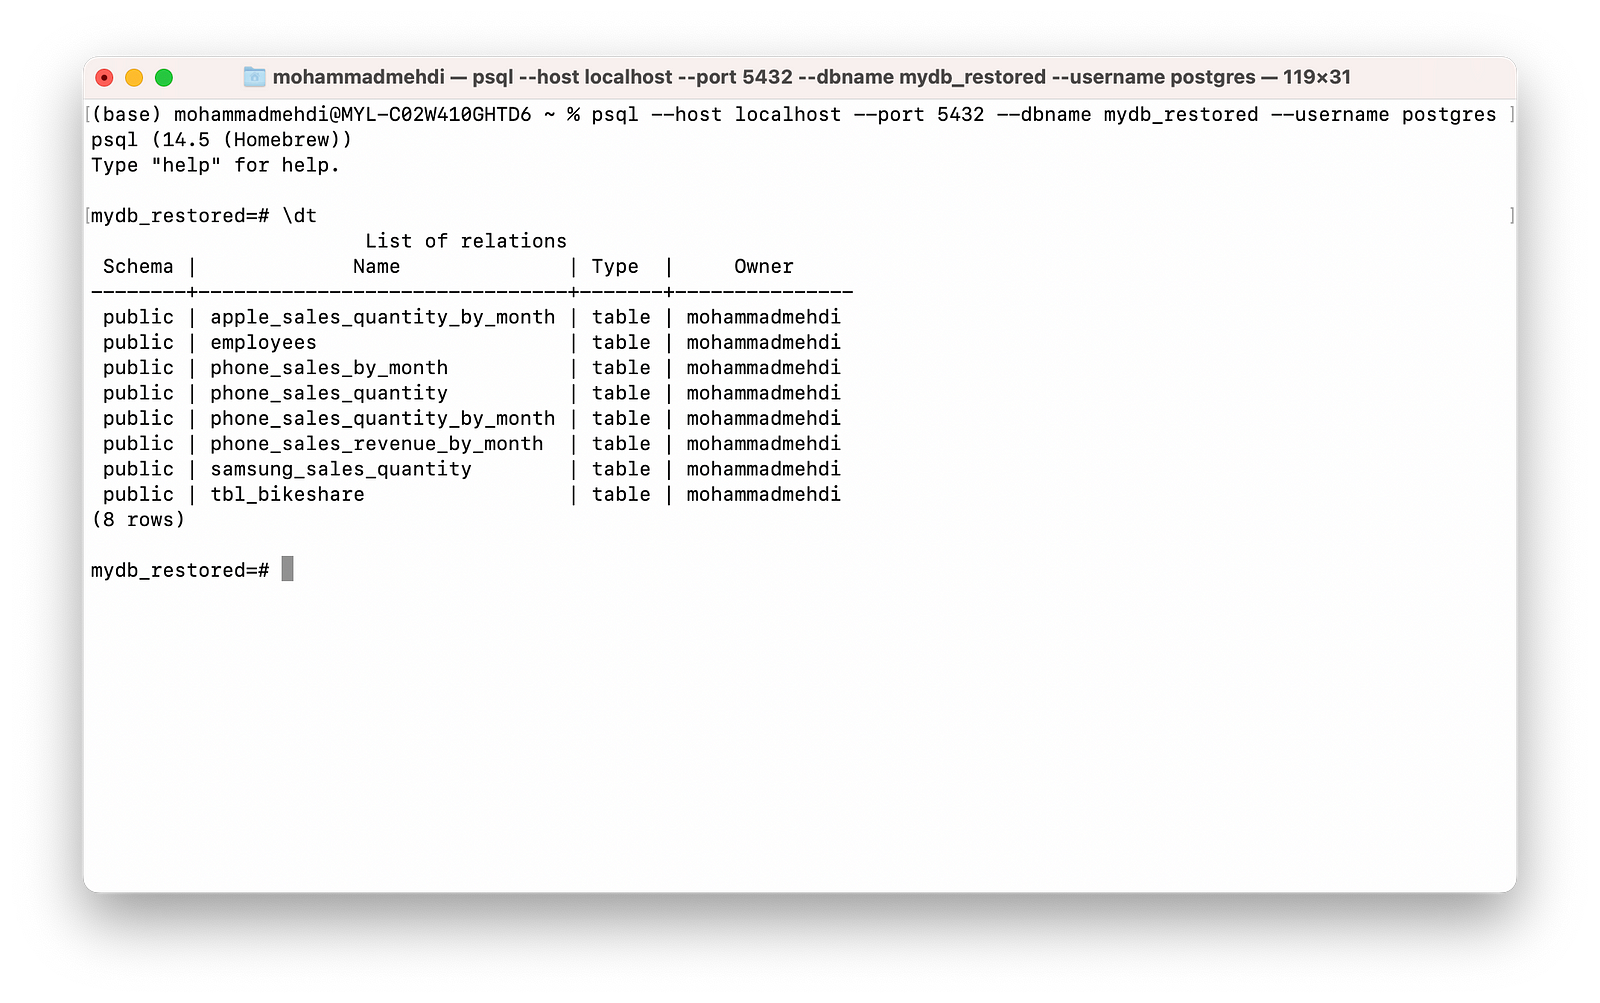
% psql --host localhost --port 5432 --dbname mydb_restored --username postgres
The three commands above will create a new database called mydb_restored, then the dump file will be restored into it, which will recreate all the database’s objects that we already made a backup of it using the pg_dump utility. The last command connects to the mydb_restored database. So, we can list all the existing relations in this database to ensure it is exactly the exact copy of the mydb database.
Summary
This tutorial discussed the PostgreSQL client applications concisely by focusing on the psql utility and making a backup of a database in plain-text format and restoring it.
I hope that you have learned something new today. Feel free to connect with me on LinkedIn or Twitter.